Sage 50 Job Cost

Sage 50 Job Cost

Sage 50 Job costing is all about tracking and accumulating the costs of a job so you know if you are making money. Good examples of who can use jobs to track expenses are construction, make to order machines, contractors who build or manufacturing a small batch of repetitive products. These expenses can include material, labor, outside services as well as other types of costs that are needed to complete your job.

Using Job Costing software, the right way can also help you make sure the entire job is invoiced during and towards the end of a project. Staying on budget is always at the top of the list during the progression of a job. In addition, you can calculate how much profit you made on a job. Using Sage 50 for this is very simple to do

Job Costing can give you the information you need to manage your jobs as they are in progress so you do not get surprised when the job is completed. Set up jobs, budgets and labor overhead. Track subcontractor insurance expiration dates and retainage along with change orders. Sage 50 Job Cost is easy to set up and easy to maintain. You can even report on certified payroll with a 3rd party add on. This is the punch list of topics we can help you understand how to use. Sage 50 Job Cost Support Training

How to set up Sage 50 Job Cost Default Information

  • Job Costing Defaults
  • Track Retainage and Burden
  • Categorize Costs by Phase and Cost Codes

How to set up Sage 50 Jobs

This is the order in which you need to add your base job information – found under maintain Jobs.

  1. Cost Codes – lowest level and can be used to break down phase codes
  2. Phase Codes – middle level and can be used to break down jobs
  3. Job numbers – the id by which you will identify your jobs

Sage 50 Jobs can also include the following information:

  • Job Start Date
  • Job End Date
  • Job Location
  • How to add phase codes estimated revenue / expenses
  • How to add cost codes estimated revenue / expenses
  • Add/Modify/Delete/Inactivate Jobs
  • Subcontractors Insurance and expiration dates
  • Create Job Estimates or Budgets
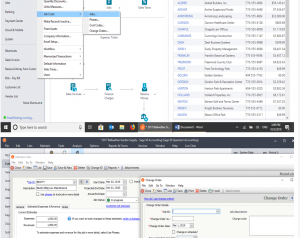
  • Change Job Numbers
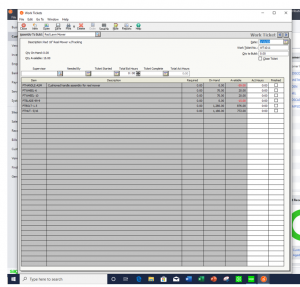
  • Recording Job Activity
  • Track Change Orders with revenue and costs
  • Issue Inventory to a Job
  • Payroll Labor Hours from Payroll or Time Tickets
  • Record Overhead
  • Issue Purchase Orders to a Job
  • Record Direct Expenses to a Job

How to Bill Sage 50 Job Cost

Put our 30 years of Sage 50 Job Costing experience to work for you.

Give us a call 800-475-1047 or visit www.jcscomputer.com


Sage 50 job cost support training Sage 50 Job Costing

Sage 50 job cost support training Sage 50 Job Costing


#sage50jobcost, #sage50jobcosting, #sage50jobcostsupport, #sage50jobcosttraining, #sage50job, #sage50jobs, #sage50jobcostinfo

Timeslips Software Support

Standard Crystal Reports in Sage 50 and Sage 50cloud

Which standard Crystal Reports are included in in Sage 50? 

Standard Crystal Reports included in Sage 50 include:

  •       Aged Payables v9
  •       Aged Receivables v9
  •       Customer Balance Graph v9
  •       Customer Detail List v9
  •       Customer Sales by Item v9
  •       Customer Sales by Month v9
  •       Inventory Labels v9
  •       Items Sold by Month v9
  •       Purchases by Unit Price v9
  •       Vendor Balance Graph v9
  •       Vendor Detail List v9
  •       Void Check Register v9

If you would like to learn more about standard Crystal Reports in Sage 50 and Sage 50cloud, Accounting Business Solutions by JCS offers a Sage 50 Manufacturing/Sage 50cloud Manufacturing training class, as well as a Crystal Reports for Sage 50 class. For Sage 50 support and training, call us today at 800-475-1047 or email us at solutions@jcscomputer.com.

Create Purchase Orders from Work Tickets in Sage 50

Create Purchase Orders from Work Tickets in Sage 50

How do you autofill or auto create Purchase Orders from work tickets in Sage 50? 

Sage 50 allows you to set up Inventory Item Defaults to auto create purchase orders in Sage 50 behind the scenes. The Ordering tab of this window has options that let you enable the auto-creation of POs for:

  1. drop-ship transactions
  2. non-drop-ship transactions
  3. work tickets

Important:For auto-creation of purchase orders to work, your company must be using the real-time posting method.

You can treat each auto-created purchase order just as you would a manually created one. You can edit the purchase order, print it, or e-mail it to a vendor in the Purchase Orders window.

Note: Even if your company is set up for auto-creation of purchase orders, Sage 50 will not automatically create POs for recurring customer invoices. Instead, you will have to manually generate POs for any inventory that you need to reorder as a result of recurring invoices.

To auto create purchase orders from work tickets in Sage 50, the following criteria must be met:

  • Each item must be set up in Maintain Inventory Items with a preferred vendor.
  • The user who is entering the transactions listed below must have access rights to add Purchase Orders.
  • The quantity ordered of one or more of the items must cause the quantity available as of the transaction date to fall below minimum stock levels.

If these conditions are met and your company is set up to auto create purchase orders in Sage 50. Sage 50 will automatically create a purchase order each time a work ticket is saved. In addition, to ensure that auto-creation works most effectively, each item in Maintain Inventory Items should be set up with a minimum stock level and minimum reorder quantity. Sage 50 will auto-create purchase orders from Work Tickets for inventory items that fall into the following item classes only

  • stock
  • substock
  • serialized stock.

If you would like to learn more about how to perform this smart function using Sage 50 and Sage 50cloud, Accounting Business Solutions by JCS offers a Sage 50 Manufacturing/Sage 50cloud Manufacturing training class. For Sage 50 support and training, call us today at 800-475-1047 or email us at solutions@jcscomputer.com. Sage 50 Training Class. 

Sage Timeslips Support

Update Work Tickets in Sage 50 and Sage 50cloud

How do you update work tickets in Sage 50? What are work tickets in Sage 50 used for?

From time to time, you will need to update work tickets with your progress. Follow the steps below to update a work ticket.

  1. From the Tasks menu, select Work Tickets. The Work Tickets window appears.
  2. Click the Open button and select the ticket that you want to update and click OK. The selected work ticket information appears in the Work Ticket window.
  3. Update any of the information that has changed on the work ticket.
  4. If you have finished or received items in the component list, select the corresponding Finishedcheck box and enter the Act Hours, if you are tracking hours.
  5. Then, click Save. After you have marked one item in your component list as finished, your work ticket is given a status of In Progress.

If you would like to learn more about how to update work tickets in Sage 50 and Sage 50cloud, Accounting Business Solutions by JCS offers a Sage 50 Manufacturing/Sage 50cloud Manufacturing training class. For Sage 50 support and training, call us today at 800-475-1047 or email us at solutions@jcscomputer.com.

Premium Crystal Reports in Sage 50 and Sage 50cloud

Which premium Crystal Reports are included in in Sage 50? 

Premium Crystal Reports included in Sage 50 include:


Assembly Item UPC_SKU Label

Using UPC/SKU (Universal Price Code/Stock Keeping Unit) labels can help you keep track of your inventory more accurately. The individual components you purchase from vendors may already contain their own UPC/SKU labels. However, you can use the Assembly Item UPC_SKU Label report to create labels for the finished products once the items are fully assembled. The labels include the following information:

  • Item ID
  • Item Description
  • UPC/SKU Number
  • Location


Assembly Planning 

This report displays details for a specified assembly, including the number of components needed, available, and on hand for the assembly. This report is helpful if printed before beginning the production of an assembly because it provides the status of the necessary components. The report includes the following fields:

  • Item ID
  • Description
  • Quantity Needed
  • Quantity on Hand
  • Quantity Available


Component Pick List

This report displays an itemized list of the locations and quantities of all components required for the specified assembly item. It is helpful to run this report right before you are about to assemble an item. The report includes the following fields:

  • Component ID
  • Description
  • Quantity Needed
  • Location
  • Initials


Deficient Components List

This report is useful for viewing which bill of material components of an assembly are in shortage. By seeing which components you’re missing, you’ll know which components you need to order before you can create the assembly. The report shows the following fields:

  • Component ID
  • Description
  • Quantity Needed
  • Quantity on Hand
  • Quantity Available


Item Sales by Customer and Purchase Order Number

This report displays item sales, sorted by customer purchase order number. This report was designed to provide an alternate method for looking up sales orders and invoices— sorted by the customer, then the customer purchase order number, and then by the sales order or invoice number. The report displays the following fields:

  • Customer ID
  • O. Number
  • Reference
  • Date
  • Description
  • Item Quantity
  • Item Subtotals


On Hand Detail Report   

This report displays detailed purchase information for inventory items that have a LIFO or FIFO costing method. The information in this report can be used to show how inventory has been valued. The On Hand Detail report displays the following fields:

  • Item ID
  • Item Description
  • Receipt Description
  • Reference
  • Receipt Date
  • Quantity
  • Unit Cost
  • Amount


Production Schedule

This report displays the assembly items on open sales orders, and is sorted by the Ship By Date. This report is designed to help you meet shipping deadlines by showing which assembly items need to be manufactured, and the order in which they need to be shipped. The report displays the following fields:

  • Ship By Date
  • Sales Order No
  • Customer ID
  • Customer Name
  • Item ID
  • Description


Stock Status by Location

Stock Status report, but includes the current quantities on sales orders and purchase orders in addition to the current quantity on hand. It also shows the history of the item (the quantity sold, received, and adjusted in the specified date range). The report displays the following fields:

  • Location
  • Item ID
  • Qty Received
  • Qty Sold
  • Qty Adjusted
  • Current Qty on PO
  • Current Qty on SO
  • Current Qty On Hand


If you would like to learn more about premium Crystal Reports in Sage 50 and Sage 50cloud, Accounting Business Solutions by JCS offers a Sage 50 Manufacturing/Sage 50cloud Manufacturing training class, as well as a Crystal Reports for Sage 50 class. For Sage 50 support and training, call us today at 800-475-1047 or email us at solutions@jcscomputer.com.

Units of Measure (U/M) in Sage 50

How do you use units of measure in Sage 50? What are units of measure in Sage 50 used for?

The Maintain Units/Measures window allows you to set up new units/measures (U/M), other than the Stocking U/M, for purchasing or selling inventory items. In this window, you can set up new units/measures, change the ID for, and delete existing units/measures.

Note: You can access this window only if you have selected the option to Enable Multi-Packs and buying and selling items in different units/measures in the Inventory Item Defaults window.

If you purchase or sell items in bulk or in multi-pack units, create new units/measures to accommodate bulk sales or purchases. This saves you time because you won’t have to enter a new item for each unit/measure of an item that you buy or sell. By creating a new unit/measure based on the stocking unit, you can purchase and sell the multi-pack unit and the single units contained in the multi-pack.

You can set up as many units/measures as you need, but you can only assign two U/Ms to an inventory item: one for sales and one for purchases.


If you would like to learn more about Units of Measure in Sage 50 and Sage 50cloud, Accounting Business Solutions by JCS offers a Sage 50 Manufacturing/Sage 50cloud Manufacturing training class. For Sage 50 support and training, call us today at 800-475-1047 or email us at solutions@jcscomputer.com.

Item Multi-Packs in Sage 50

How do you use item multi-packs in Sage 50? What are item multi-packs in Sage 50 used for?

The Item Multi-Packs window allows you to assign additional units/measures to an inventory item, thereby creating a multi-pack. You can access this window by selecting the U/M button, which is located next to the Stocking U/M field in the Maintain Inventory Items window. In the Item Multi-Packs window, you can do the following:

  • change the Stocking U/M
  • allow items to be purchased or sold in a unit/measure other than the Stocking U/M, or multi-pack
  • assign a U/M, weight, and UPC/SCC code for multi-packs that you purchase
  • assign a U/M, weight, and UPC/SCC code for multi-packs that you sell

You can assign two units/measures in addition to the Stocking U/M to an inventory item: one for purchases and one for sales. When you purchase or sell items in units/measures that you have set up in Maintain Units/Measures, the subsequent item, when purchased or sold, is referred to as a multi-pack. Multi-Packs in Sage 50 are simply any inventory item that has been assigned a unit/measure other than the Stocking U/M. The resulting item, usually a box or a pack, contains more than one stocking unit of the inventory item.

Because you can only assign two units/measures to an inventory item, you should select the unit/measure in which you usually purchase or sell the item. For example if you buy in bulk but sell in single units, select the bulk unit in this window. After you have assigned purchasing and sales units/measures to an inventory item, you will be able to select the U/M for line items on the following windows: Quotes, Sales Orders, Sales/Invoicing, Receipts, Credit Memos, Select For Purchase Orders, Purchase Orders, Purchase/Receive Inventory, and Payments.


If you would like to learn more about Item Multi-Packs in Sage 50 and Sage 50cloud, Accounting Business Solutions by JCS offers a Sage 50 Manufacturing/Sage 50cloud Manufacturing training class. For Sage 50 support and training, call us today at 800-475-1047 or email us at solutions@jcscomputer.com.

Close Work Tickets in Sage 50

How do you close work tickets in Sage 50?

What are work tickets in Sage 50 closed for? When a work ticket is closed, an assembly build record is automatically created behind the scenes. Because the assembly build record is automatically created, you won’t have to build the assembly in the Build/Unbuild Assemblies window. To close a work ticket, follow the steps below.

  1. From the Tasks menu, select Work Tickets. The Work Tickets window appears.
  2. Click the Open button and select the number of the ticket that you want to close and click OK. The selected work ticket information appears in the Work Ticket window.
  3. To complete and close this work ticket, Enter or select 2/17/20  in the Ticket Completed box then select the Close Ticket checkbox. This selection will automatically complete and close the work ticket after, the ticket will be given a status of Closed.       
  4. After you have finished, select SaveWhen you save a closed work ticket, an assembly build record is automatically created behind the scenes. 

If you would like to learn more about how to close work tickets in Sage 50 and Sage 50cloud, Accounting Business Solutions by JCS offers a Sage 50 Manufacturing/Sage 50cloud Manufacturing training class. For Sage 50 support and training, call us today at 800-475-1047 or email us at solutions@jcscomputer.com.

Print Work Tickets in Sage 50 and Sage 50cloud

How do you print work tickets in Sage 50? What are work tickets in Sage 50 used for?

Work tickets can be printed and used in various ways. Printed work tickets may be used in your Inventory department to gather the materials needed to build an assembly. Likewise, copies of closed work tickets may be sent along with the necessary materials to authorize the shop to build an assembly.

In Sage 50, you can print work tickets in two ways:

  1. By clicking the Print button in the Work Tickets window
  2. By selecting Work Tickets from the Inventory Report List in the Select a Report window

If you are interested in printing just one work ticket and you already have the Work Tickets window open, print the ticket by selecting the Print button. However, if you are interested in printing a number of work tickets, print the work tickets from the Inventory Report List in the Select a Report window. Use the following procedure to print work tickets in the Select a Report window.

If you would like to learn more about how to print work tickets in Sage 50 and Sage 50cloud, Accounting Business Solutions by JCS offers a Sage 50 Manufacturing/Sage 50cloud Manufacturing training class. For Sage 50 support and training, call us today at 800-475-1047 or email us at solutions@jcscomputer.com.

Sage 50 Bill of Materials for inventory management of Sage 50

Sage 50 Bill of Materials Revisions

Bill of Materials Revisions in Sage 50

Revisions allow you to make changes to the bill of materials for assembly items that have been used in transactions. You can access the Revisions window by selecting the Revisions button, which is located on the Bill of Material tab of the Maintain Inventory Items window. The Revisions window lists all revisions that have been made to the bill of materials and the effective date for the revision. From this window, you can either create a new or edit an existing revision. The original bill of materials is always listed as Revision 0 and cannot be deleted.

Sage 50 Bill of Materials for inventory management of Sage 50

Updates

Bill of Material – Revisions are valuable because they update the bill of materials without altering the original bill of materials. Any item built before the new revision date will be associated with the current assembly build. Revisions allow you to make slight changes to the bill of materials without requiring you to create a new Sage 50 inventory assembly.

Although you can use them in a number of ways, revisions are only intended to be used to make minor changes to the bill of materials. To help clarify what constitutes a minor change and to further explain when to use a revision as opposed to another assembly item, consider the following examples:

Sage 50 Bill of Material – Revision vs New

  • When to create a revision: You produce large quantities of an item and occasionally the options for that item change mid-stream. Let’s say that the screw that you are using for the item is no longer available or you want to use a different screw.  By replacing this component only in the bill of materials, you create a revision. This allows you to produce an assembly item that may differ slightly, but is treated identically for inventory purposes.
  • When to create a new assembly item: You produce large quantities of an item and occasionally the options for the item change mid-stream. Let’s say that one of the components for the item has tripled in price.In this case, we recommend that you create a new assembly item instead of a revision. You should create a new assembly item when costs greatly increase or components change significantly.

Changes to the bill of materials are entered on either the Create a New Revision or on the Edit an Existing Revision window. This is dependant upon whether you selected the New or Edit button in the Revisions window.

Modifications

In this window, you can add and delete items, move items up or down on the component list. In addition, you cab change the quantity required. While you have a great deal of flexibility in what you can change. However, it is important to remember that revisions should only be used to make minor changes to the bill of materials.

When entering a revision, a ‘revision number’ is assigned to the revision and will be listed in the window. For reports that list the bill of materials, the corresponding revision number will also be listed on the report.This will help you keep track of which items should be included in the bill of materials.

Two other very important parts of a revision are the Effective Date and the Note. The effective date is important because it determines when a revision will be used by Sage 50 to build or un-build assemblies. Likewise, a note helps you identify the purpose of a revision. If a note is not entered, Sage 50 will automatically insert a generic note. This note includes the date, time, and the Sage 50 user who entered the revision.

To learn more about Bill-of-Material Revisions in Sage 50 and Sage 100, Accounting Business Solutions by JCS offers training classes. Both a Sage 50 Manufacturing and Sage 50 Inventory Management training classes. For Sage 50 support and training, call us today at 800-475-1047 or visit us www.jcscomputer.com.

X