Entering Purchase Orders in Sage 100

Learn how to enter Purchase Orders in Sage 100 with Sage 100 training classes from Accounting Business Solutions by JCS!


Entering Purchase Orders


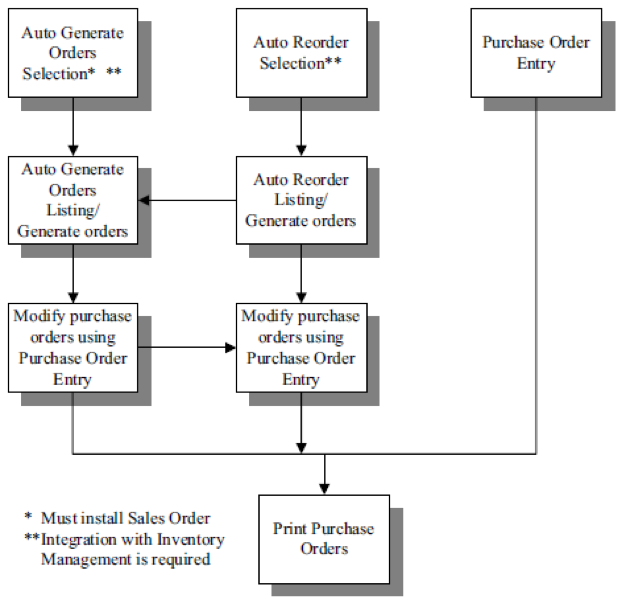
Automatically Generate Purchase Orders

You can automatically generate purchase orders based on reorder information in Inventory Management or on entered sales orders


  • Primary Vendors must have been assigned to Items

  • Use Auto Reorder Selection on the Main menu to generate purchase orders for items whose on-hand quantities are at or below the reorder point defined in Inventory.
  • After Creation they can be maintained in PO Entry.
  • Vendor price structures defined in PO Setup will notbe taken into account.

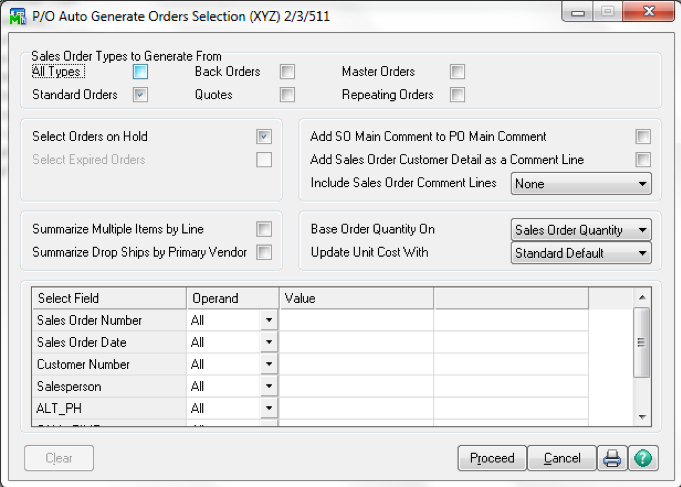
  • Use Auto Generate Orders Selection on the Main menu to generate purchase orders for a selected group of sales orders.
  • You can combine all requests for an item into a single line on the order if you are summarizing; however, the report displays each request for the item.
  • You choose during the selection process, how purchase quantities are to be calculated.
  • You will be prompted for the next PO number.
  • After Creation they can be maintained in PO Entry.

Reports for Determining What to Order

  • Inventory Stock Status Report: Use the Inventory Stock Status Report to view current stock levels, pending purchase orders, and pending back orders for all or a selected range of items. In addition, the quantity available for sale is provided as of the current date. It includes the reorder point and the average cost.
  • Inventory Reorder Report: Use the Inventory Reorder Report to view a recommended reorder quantity for each item based on the settings in Inventory Maintenance. The report also provides the current on-hand, purchase order, sales order, and back order quantities for each item.
  • Inventory Turnover Report: Use the Inventory Turnover Report to evaluate inventory item turnover. This report is helpful in determining stock levels and reordering settings for items. Information is displayed by item, warehouse, and inventory totals.
  • SO Back Order Report: The Back Order Report details all back orders on file by item or by customer. Information for each back order listed includes the order number and date, the ship date, and the customer number and name.
  • SO Daily Drop Ship Report: The Daily Drop Ship Report on the Sales Order Main menu itemizes all inventory items, miscellaneous charges, or special items to drop ship directly to the customer by the vendor. If Purchase Order is installed, you can create purchase orders based on sales orders containing drop ship items.
    • Only line items designated on the sales order to drop ship are displayed.
    • After printing the report, you have the option of clearing the daily drop ship information.

Purchase Orders Types

  • Standard Order
  • Master Order
  • Repeating Order
  • Drop Ship
  • Material Requisition

Purchase Orders Entry – Default Values

You can save default values for just the current purchase order entry session or for future sessions as well. Values saved for future session are stored by user logon or workstation.

Purchase Orders Entry – Header


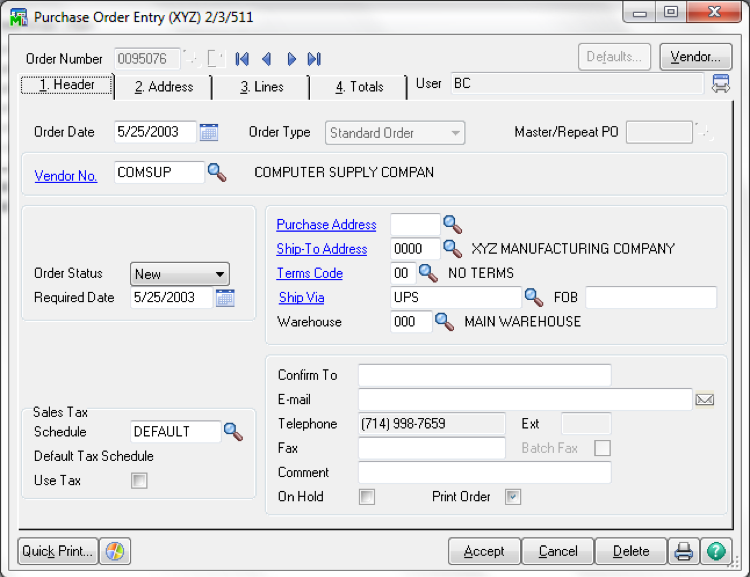
  • Can add on the fly vendors.
  • Can elect to track Use Tax for purchases, but tax amounts cannot be added to the Item cost.
  • Order Status

New: This is the default status assigned to a purchase order when entered. The status is automatically updated to the status of Open when it is printed.

Change: This status is used to make modifications to existing purchase orders or back orders for which a change order is required by the vendor. You can print change orders when printing purchase orders.

Open: This status is normally entered during the process of converting from another accounting system for orders not received or invoiced; however, you can assign the status of Open at anytime, whether the order is printed or not.

Completed: After a purchase order is fully received and invoiced (if the Post A/P Invoice check box is selected in Purchase Order Options), a status of Completed is assigned to it automatically and the purchase order is then unavailable for change. Completed purchase orders are purged during period-end processing depending on settings in Purchase Order Options.

Back Order: If lines are added or the ordered quantity is changed while receiving the order, the status of Back Order is assigned to the order.


Purchase Orders Entry – Address

Purchase Orders Entry – Lines

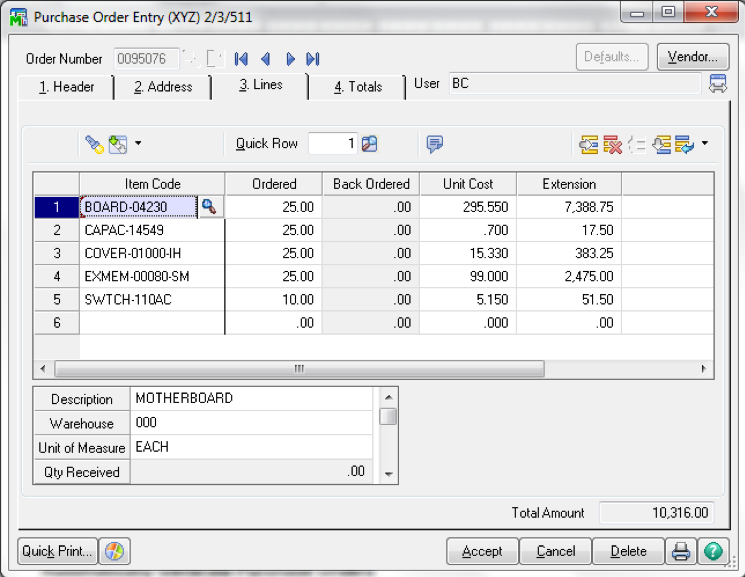
  • Virtually unlimited number of lines
  • Qty. on PO field in Inventory is updated after Inventory items are accepted.
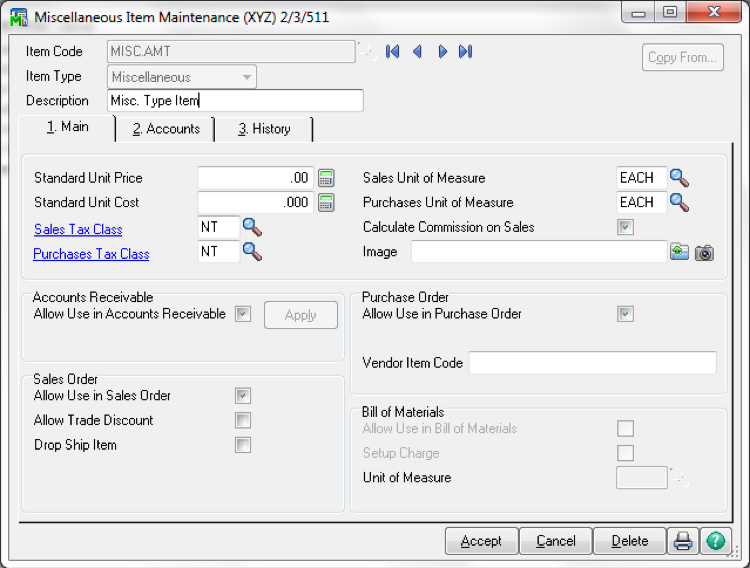
  • Misc. items and comment codes are selected by using a forward slash (/) prefix.
  • Special Items are enter by using an asterisk (*) prefix.
  • Additional line options and fields
  • Item Inquiries (quantity, vendor price, reorder data, item status, alternates, memos
  • Job Integration


Purchase Orders Entry – Totals
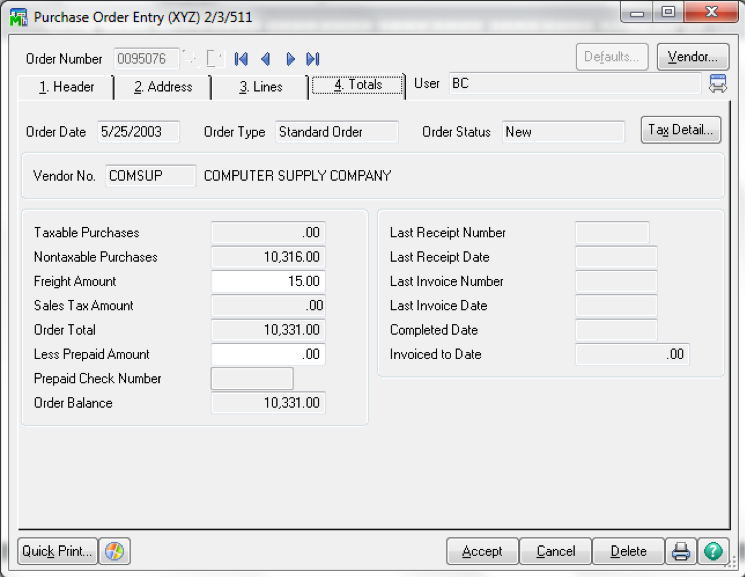
  • Tax Detail button
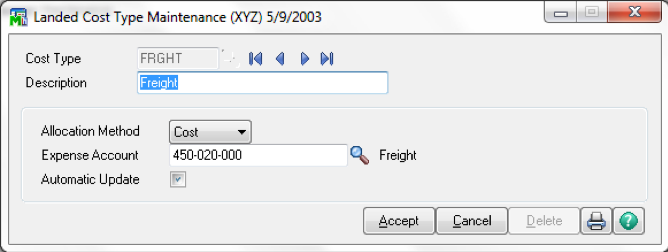
  • Prepaid Freight is used for Allocation to item cost, but does not affect PO totals.


  • Vendor button
  • Quick Print

Drop Ship Orders

  • Drop Ship orders do not affect inventory.
  • When closed using Receipt of Invoice Entry, invoice is used for delivery confirmation.
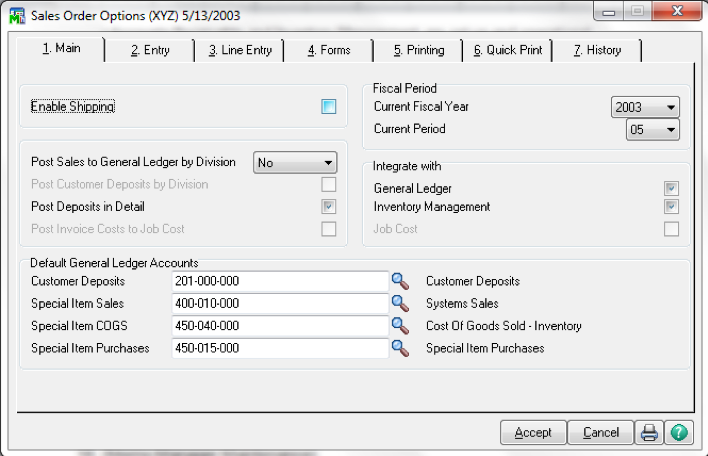
  • When PO Receipt of Invoice is processed, special item cost is debited and A/P is credited.
  • When SO Invoice is processed, A/R is debited and special item sales is credited.
  • Tie to Sales Order Number

Repeating Orders

  • Use as template for routine standard orders.
  • Qty. on PO field in Inventory is not updated when original Repeating Order is created.
  • Copy to Use.
  • Cumulative quantities are tracked.
  • Original order quantity is defaulted for new order based on Repeating Order.
  • Expiration

Master Orders

  • Contract Order.
  • Qty. on PO field in Inventory is not updated when original Master Order is created.
  • Copy to Use.
  • Cumulative quantities ordered and received are tracked on the Master Order.
  • Quantity remaining is defaulted for new order based on Master Orders.
  • Expiration


Printing Purchase Orders


Are you interested in learning how to enter Purchase Orders in Sage 100? Accounting Business Solutions by JCS offers Sage 100 training classes, including how to customize options in Purchase Order in Sage 100.  Call us today at 800-475-1047 or email us at solutions@jcscomputer.com today to get started.

Period-end processing in Sage 100cloud Purchase Order

Period-end processing in Sage 100cloud Purchase Order


This time of year, period-end processing in Sage 100 is a useful feature to know. Learn how to use period-end processing in Sage 100 with the Sage 100 Purchase Order training class from Accounting Business Solutions by JCS today!


Utilities & Period-End Processing

  • Period-End Report Selection
  • Period-End Processing
      • The following actions are performed when the period is closed:
        • Prompts the user to print the monthly reports
        • Clears period-to-date quantity and purchase history for miscellaneous charge codes
        • Removes completed purchase orders and master and repeating orders with expiration dates before the period-ending date.
        • Increments the current period in Purchase Order Options.
        • If the Purge Purchase Order Recap at Period End check box is selected in Purchase Order Options, all completed and cancelled purchase orders are removed from the recap.
        • If you selected Until Period End at the Retain Receipt History field in Purchase Order Options, receipt history is purged automatically for completed purchase orders

Purge Tasks

There are six purge tasks available on the Utilities menu, which can be used anytime during the accounting cycle. With the exception of the Purge Purchase Order Receipt History task, you can define a date to use when purging history.

Note: Always back up your data before performing a purge.

Purge Completed Purchase Orders

  • Removes all orders completed based on the Purchase Order accounting date, the date completed, and the number of days entered at the Number of Days to Retain Completed PO field in Purchase Order Options.
  • You can use this task to provide additional disk space before the regular period end processing.

Purge Expired Master/Repeating Orders

  • Removes master and repeating orders with expiration dates before the accounting date.
  • Automatically occurs during period-end processing.

Purge Completed or Cancelled PO Recap

  • Removes data for orders completed or cancelled on or prior to the accounting date for which there is no receipt history.
  • If the Purge PO Recap at Period End check box is selected in Purchase Order Options, this task is automatically run at period-end.
    • This does not purge open purchase orders.

Purge Obsolete Purchase Orders

  • Removes all obsolete purchase orders whose order date, last receipt, or last invoice are before the date entered, regardless of their status.
  • Purging obsolete purchase orders may cause your Purchases Clearing Report not to match with the purchases clearing account in the General Ledger Trial Balance Report.

Purge Purchase Order Receipt History

  • Removes receipt history for completed purchase orders.

Purge Purchases History

  • Removes history for receipts or postings made on or before a date you select.
  • This task is in addition to the functionality performed during the period-end process.


To learn more about period-end processing in Sage 100 Purchase Order, call the Sage 100 experts at Accounting Business Solutions by JCS today at 800-475-1047 or email us at solutions@jcscomputer.com. Our experienced Sage 100 consultants offer Sage 100 training classes, including how to use period-end processing in Sage 100 ERP, Sage 100 Manufacturing, and Sage 100cloud.

Sage 100 Purchase Order Maintenance

Learn how to maintain Sage 100 Purchase Order with Sage 100 training classes from Accounting Business Solutions by JCS!

One of the most attractive features of Sage 100 is its flexibility, and the Sage 100 Purchase Order module is no exception. Sage 100 Purchase Order Maintenance contains a variety of options which can be customize to fit your particular needs.


Ship-To Address Maintenance

Miscellaneous Item Maintenance

  • Create Common Information (CI) non-inventory items
  • Select Miscellaneous as the item type for non-inventory items that have a unit price or unit cost.
  • Select Charge for fixed charges that are applied to an invoice.
  • Select Comment as the item type to enter a standard comment. For example, you can enter a comment for warranty information or care instructions.
  • Standard Codes M & C


Vendor Price Maintenance

  • Create Price Structure based on Vendor ID
  • Create Price Structure based on Product Line by Vendor
  • Create Price Item Specific Structure by Vendor ID
  • Same window as from Vendor Maintenance
  • Same window as from Item Maintenance


Landed Cost Type Maintenance

  • Methods includes Cost, Weight, Quantity, and Volume.
  • Weight or Volume allocate only to inventory items.
  • The FRGHT cost type is defined by the system and cannot be delete.
  • If the Automatic Update check box is selected, the landed cost amount for this cost type automatically updates based on the freight amount entered for the invoice.

Memo Manager Maintenance

  • Assign security roles to where memo’s can be created/viewed


Are you interested in learning how to maintain Sage 100 Purchase Order? Accounting Business Solutions by JCS offers Sage 100 training classes, including how to customize options in Purchase Order in Sage 100.  Call us today at 800-475-1047 or email us at solutions@jcscomputer.com today to get started.

Sage 100 Sales Order Options

Learn how to use Sage 100 Sales Order Options with Sage 100 training classes from Accounting Business Solutions by JCS!

One of the most attractive features of Sage 100 is its flexibility, and the Sage 100 Sales Order module is no exception. SO in Sage 100 has a variety of customizable options which range from sales tax reporting and aging options to printing and batch processing options. Continue reading to see the various customizable screens in Sage 100 Sales Order.


Sales Order Options – Main

  • Retain Complete PO’s & Auto Closing PO’s
  • Posting to AP


Sales Order Options – Additional

  • Shipping
  • Posting to GL
  • GL Accounts (*Special Items Acct. must match Acct. in SO if installed)

Sales Order Options – Entry

  • Batch Processing
  • Auto Numbering
  • Duplicate P/O Checkig
  • Defaults
  • Other


Sales Order Options – Line Entry

  • Warehousing
  • Displays
  • Purchase Controls
  • Allowances and Defaults
  • Warranty

Sales Order Options – Forms


Sales Order Options – Printing

  • Journal Options
  • Report Options
  • Recaps (cannot be reprinted after updating Sales Orders)


Are you interested in learning how to customize Sage 100 Sales Order? Accounting Business Solutions by JCS offers Sage 100 training classes, including how to customize options in Sales Order in Sage 100.  Call us today at 800-475-1047 or email us at solutions@jcscomputer.com today to get started.

Sage 100 Purchase Order Options

Learn how to use Sage 100 Purchase Order Options with Sage 100 training classes from Accounting Business Solutions by JCS!

One of the most attractive features of Sage 100 is its flexibility, and the Sage 100 Purchase Order module is no exception. PO in Sage 100 has a variety of customizable options which range from sales tax reporting and aging options to printing and batch processing options. Continue reading to see the various customizable screens in Sage 100 Purchase Order.


Purchase Order Options – Main

  • Retain Complete PO’s & Auto Closing PO’s
  • Posting to AP


Purchase Order Options – Additional

  • Posting to GL
  • GL Accounts (*Special Items Acct. must match Acct. in SO if installed)


Purchase Order Options – Entry

  • Batch Processing
  • Auto Numbering
  • Defaults
  • Other


Purchase Order Options – Line Entry

  • Landed Costs or Allocated Freight (only works if freight is known at Receipt of Goods)
  • Defaults
  • Drop Ship Options (auto entry from SO)

Purchase Order Options – Printing

  • Register Options
  • Backorder Fill Reporting

Purchase Order Options – History


Are you interested in learning how to customize Sage 100 Purchase Order? Accounting Business Solutions by JCS offers Sage 100 training classes, including how to customize options in Purchase Order in Sage 100.  Call us today at 800-475-1047 or email us at solutions@jcscomputer.com today to get started.

How to Set Up Sage 100 Sales Order

Learning how to set up Sage 100 Sales Order is crucial to your Sage 100 success. Learn how to set up Sage 100 Sales Order with the certified Sage 100 consultants at Accounting Business Solutions by JCS.


What’s needed to set up Sage 100 Sales Order

Before using Sales Order for a new company, you must complete the Sales Order system startup process. Before beginning the system startup process, gather the following information:

  • Accounts Receivable and Inventory Management are set up and operational
  • The general ledger chart of accounts
  • A list of miscellaneous charges for your business
  • A list of Items sold by your business but not managed through Inventory
  • A list of shipping Rates
  • All open Sales Orders and back orders are ready to enter

How to set up Sage 100 Sales Order Module

  1. Enter the Company Code
  2. Enter Accounting Date
  3. Complete Inventory Management Setup
  4. Complete the Accounts Receivable Setup
  5. (Complete the Inventory Setup)
  6. (Complete the Job Cost Setup)
  7. (Define Sales Tax Information)
  8. Complete the Sales Order Setup Wizard
  9. Define Sales Order Options
  10. Shipping Rate Maintenance
  11. (Misc. Item Maintenance)
  12. (Customer Last Purchase Maintenance)
  13. (Cancel/Reason Code Maintenance)
  14. (Define Shipping Setup Options)
  15. (Shipper ID  Maintenance)
  16. (Memo Manager Maintenance)
  17. Outstanding S/O Entry
  18. Daily Processing


Are you interested in learning how to set up Sage 100 Sales Order? Accounting Business Solutions by JCS offers Sage 100 training classes, including how to set up Sales Order in Sage 100.  Our experienced, certified professionals offer a full line of Sage 100 support, training, and data repair. Call us today at 800-475-1047 or email us at solutions@jcscomputer.com today to get started with Sage 100 software today!

How to Set Up Sage 100 Purchase Order

Learning how to set up Sage 100 Purchase Order is crucial to your Sage 100 success. Learn how to set up Sage 100 Purchase Order with the certified Sage 100 consultants at Accounting Business Solutions by JCS.


What’s needed to set up Sage 100 Purchase Order

Before using Purchase Order for a new company, you must complete the Purchase Order system startup process. Before beginning the system startup process, gather the following information:

  • Accounts Payable and Inventory Management are set up and operational
  • The general ledger chart of accounts
  • A list of miscellaneous charges you commonly incur, vendor quantity discount rates available for inventory items, all addresses to which you have orders shipped, and landed cost types you track
  • All open purchase orders and back orders are ready to enter
  • All receipts, invoices, returns, and materials requisitions as of your last closed accounting period are ready to enter


How to set up Sage 100 Purchase Order

  1. Enter the Company Code
  2. Enter Accounting Date
  3. Complete Inventory Management Setup
  4. Complete the Accounts Payable Setup
  5. Define Sales Tax Information (if set to track in A/P)
  6. Complete the Purchase Order Setup Wizard
  7. Define Purchase Order Options
  8. Ship-to Address Maintenance
  9. Misc. Charge Maintenance
  10. Landed Cost Maintenance
  11. Vendor Price Level Maintenance
  12. Outstanding P/O Entry
  13. Daily Processing


Are you interested in learning how to set up Sage 100 Purchase Order? Accounting Business Solutions by JCS offers Sage 100 training classes, including how to set up Purchase Order in Sage 100.  Our experienced, certified professionals offer a full line of Sage 100 support, training, and data repair. Call us today at 800-475-1047 or email us at solutions@jcscomputer.com today to get started with Sage 100 software today!

Sage 100 Accounts Receivable Maintenance

Learn how

Sage 100 Accounts Receivable Maintenance with Sage 100 training classes

from Accounting Business Solutions by JCS!

One of the most attractive features of Sage 100 is its flexibility, and the Sage 100 Accounts Receivable module is no exception. Sage 100 Accounts Receivable Maintenance contains a variety of options which can be customize to fit your particular needs.


Division Maintenance


  • GL Accounts are assigned by division
  • All customers must be assigned to a division
  • If divisions are created, they can be set to post to specified GL account segments
  • Use 00 (default) if no divisions are to be tracked


Bank Code Maintenance

  • A is default bank code
  • Bank Code Beginning Balances are entered through Bank Reconciliation


Terms Code Maintenance

  • 00 is default terms code and cannot be deleted
  • During invoice entry, discount amounts are calculated automatically and invoice and discount due dates display based on the assigned terms code.
  • Although terms codes are assigned to customers in Customer Maintenance, you can change them in Invoice Data Entry.
  • You can add new codes automatically using such tasks as Invoice Data Entry and Customer Maintenance.
  • The Minimum Days Allowed field enables the proper calculation of the due date and discount date when the Day of the Month check box is selected.


Sales Tax

  • For calculation of sales tax in AR or SO


  • Sales Tax Class Maintenance


  • Sales Tax Code Maintenance

  • Sales Tax Schedule Maintenance


Sales Tax Account Maintenance


Sales Person Maintenance – Main

  • Options for calculating and tracking commissions are entered in Accounts Receivable Options.
  • A salesperson number and commission rate are assigned to each salesperson. The first two characters of the salesperson number indicate the division the salesperson is assigned.
  • You can assign a default salesperson to each customer in Customer Maintenance; however, you can change the default salesperson when entering transactions in Invoice Data Entry.
  • You can link salespersons to vendors, employees, or account numbers for commission tracking and payment if the Update Commissions to Other Modules check box is selected in Accounts Receivable Options.

– Click Link to establish these links.


Sales Person Maintenance – History

  • Switch View
  • Fix


Payment Type Maintenance


  • A default payment type of CHECK is created automatically and you cannot delete this payment type. CHECK is also assigned to new customers by default.
  • The asset account number defined is debited when the payment posts in Sales Order.
  • For Credit cards, the default transaction method selected determines how to handle the transfer of funds when recording credit card deposits and payments in Sales Order.
  • The accrual account is used to post the estimated accrued expense associated with accepting a credit card for payment. This expense is accrued during the sales journal update process and posts to the account entered at the Accrual Account field.
  • The merchant ID is your ID with the credit card company. This information does not display when receiving credit card deposits.
  • The discount percentage rate, transaction fee, and authorization term are assigned by the merchant bank.
  • Credit card expenses equal the discount percentage plus the per transaction fee.
  • At the Validation Code Length field, enter the length of the validation code sent to the credit card server.
  • Select the Allow Corporate Cards check box to accept corporate credit cards for the selected payment type.


Miscellaneous Item Maintenance

Use Miscellaneous Item Maintenance on the Setup menu in Accounts Receivable or on the Common Information Main menu to identify and track miscellaneous products or services sold and purchased. This task is used primarily if Sales Order or Purchase Order and Inventory Management are not activated for the selected company.

Note: Items created through this task in Accounts Receivable are also available in Common Information and any other module containing the same task.

Miscellaneous Item Maintenance – Main

  • During Invoice Data Entry, item codes are used to automatically display such information as the description, price, and cost for each item sold.
  • The item code determines the posting to General Ledger for the sale of this item code when invoices are updated.
  • The sales tax class selected determines if sales tax is calculated when the item is sold.
  • For items or services sold in quantities, you can display a unit of measure on the customer’s invoice. The user is also prompted for a quantity in Invoice Data Entry.
  • Select the Calculate Commission on Sales check box to calculate commission on this item code when entering transactions in Accounts Receivable.
  • For both Miscellaneous and Charge Item Types, you can define a unit price and unit cost.
  • You can define a sales, cost of goods sold, inventory, and purchases account on the Accounts tab for items assigned to the Miscellaneous item type.
  • For the Charge item type, you cannot enter a unit of measure for item codes assigned to this type and you can only define a sales account and purchases account on the Accounts tab.
  • Select Comment as the item type to enter a comment that you can add to an invoice. For example, you can enter a comment for warranty information or care instructions.
  • Standard Codes M & C are available for one-time entries


Miscellaneous Item Maintenance – Accounts

  • The Cost of Goods Account and Inventory Account fields are only available if the Cost of Goods check box is selected in Accounts Receivable Options.
  • If you selected to post sales by division, the appropriate subaccount segment value is replaced with the value defined for the division assigned to the customer in Division Maintenance.


Miscellaneous Item Maintenance – History


Memo Manager Maintenance

  • Assign security roles to where memo’s can be created / viewed


Are you interested in learning how to maintain Sage 100 Accounts Receivable? Accounting Business Solutions by JCS offers Sage 100 training classes, including how to customize options in Accounts Receivable in Sage 100.  Call us today at 800-475-1047 or email us at solutions@jcscomputer.com today to get started.

Sage 100 Accounts Receivable Options

Learn how to use Sage 100 Accounts Receivable Options with Sage 100 training classes from Accounting Business Solutions by JCS!

One of the most attractive features of Sage 100 is its flexibility, and the Sage 100 Accounts Receivable module is no exception. AR in Sage 100 has a variety of customizable options which range from sales tax reporting and aging options to printing and batch processing options. Continue reading to see the various customizable screens in Sage 100 Accounts Receivable.


Accounts Receivable Options – Main


  • Divisions – used for reporting purposes and default posting accounts.
  • Expanding the customer number cannot be undone. Non-graphical forms (legacy modules) do not support expended customer numbers.
  • Posting
  • Segment Substitution by sub-account segment is divionalized.
  • Sales Tax Reporting – determines if sales tax is calculated and tracked.
  • Job Cost retention
  • Integration


Accounts Receivable Options – Additional


  • Open Item vs Balance Forward.

Open Item: When entering cash receipts, you can apply the payment to a specific invoice and the invoice detail remains in the system.

Balance Forward: During period-end processing, open invoice balances are converted to one balance. When entering cash receipts, the payment is applied to the total amount due for the customer, not to individual invoices. Invoice detail is not retained in the system.

Mixed: Allows you to determine on a customer-by-customer basis in Customer Maintenance if they are Balance Forward or Open Item.

  • Aging – How calculated and catagories.
  • Commissions
  • Finance Charges


Accounts Receivable Options – Credit


  • Credit limit checking

Select None if you do not want to check the customer’s credit limit when entering transactions.

Select Customer’s Credit Limit Only to have the system compare the customer’s current open invoice balance to the customer’s credit limit or a specified amount. If the open invoice balance exceeds the credit limit or amount defined, a warning displays.

  • At the Margin for Customer’s Credit Limit Exceeded Warning field, you can enter a credit limit margin.
  • If a margin is entered, the customer’s current open invoice balance is compared to their credit limit, if the difference falls within the margin entered, the credit limit warning displays.

Select Aging Category Onlyto have the system compare the customer’s aged invoice balance to the customer’s credit limit or a specific amount you specify. If the aged invoice balance exceeds the credit limit or amount defined, the credit limit warning displays.

  • At the Aging Category for Credit Limit Exceeded Warning field, you determine which aging categories are used when comparing to the customer’s credit limit or specified amount. For example, if you select 90+ Days, the system calculates the total aging balance for all aging categories up to and including the 90+ days aging category.
  • The options available are based on the aging categories defined on the Additional tab.
  • At the Aging Category Balance Exceeds Amount field, you can enter an amount to compare to the aged invoice balance calculated for the customer. If the amount exceeds the amount entered, the credit limit warning displays.

Select Bothto have the system compare both the current open invoice balance and aged invoice balance to the customer’s credit limit.

  • You can define both a margin and determine the aging category to use if Both is selected at Credit Limit Checking field.
  • he system displays a warning if any of the conditions discussed for the Aging Category Only and Customer’s Credit Limit Only options are met.
  • Automatic Recalculate Aging (Never, Always, By Number of Days)

Note: The date the aging information was last recalculated for a customer is maintained in the AR_Customer file.


Accounts Receivable Options – Entry

  • Batch Processing
  • Defaults

– If the Require Deposit Amount check box is selected, you are required to enter a total cash and credit card deposit amount in Cash Receipts Entry to be compared against the actual transactions entered.

  • Resets


Accounts Receivable Options – Printing


Accounts Receivable Options – History

  • Customer Audit
  • Cash Receipts
  • Invoice History

The Retain In Detail field determines if invoice history is retained in detail or summary.

Yes: Select Yes to have the ability to drill down to view invoice information, reprint invoices, and print detailed invoice reports.

Summary: Select Summary to retain information regarding the original invoice amount and payment terms. Detailed information such as the items or services purchased are not retained.

No: Select  No if you do not want to retain detailed or summary invoice history.

  • Sales History


Are you interested in learning how to customize Sage 100 Accounts Receivable? Accounting Business Solutions by JCS offers Sage 100 training classes, including how to customize options in Accounts Receivable in Sage 100.  Call us today at 800-475-1047 or email us at solutions@jcscomputer.com today to get started.

Setting up Sage 100 Accounts Receivable

Correctly setting up Sage 100 Accounts Receivable is crucial to your Sage 100 success. Learn how to set up Sage 100 Accounts Receivable with the certified Sage 100 consultants at Accounting Business Solutions by JCS.


What’s needed to set up Sage 100 Accounts Receivable

Before using Accounts Receivable for a new company, you must complete the Accounts Receivable system startup process. Before beginning the system startup process, gather the following information:

  • Your general ledger chart of accounts
  • A list of states, counties, and local areas to which you report sales tax and their tax rates
  • Your bank account number(s) for the checking account(s) used by Accounts Payable
  • A list of standard payment terms offered to your customers
  • A list of customers, including addresses and phone numbers
  • A list of payments and payment types
  • A list of sales people
  • All open invoices at the time of installation


How to set up Sage 100 Accounts Receivable


  1. Enter the Company Code
  2. Enter Accounting Date
  3. Complete the Accounts Receivable Setup Wizard
  4. Define Accounts Receivable Options
  5. Division Maintenance
  6. (Bank Code Maintenance)
  7. Terms Code Maintenance
  8. Sales Tax Class Maintenance
  9. Sales Tax Code Maintenance
  10. Sales Tax Schedule Maintenance
  11. Sales Tax Account Maintenance
  12. Salesperson Maintenance
  13. Payment Type Maintenance
  14. (Miscellaneous Item Maintenance)
  15. (Memo Manager Maintenance)
  16. Customer Maintenance
  17. Beginning Balance Entry
  18. Open Invoice Entry
  19. Print Invoice Register and Update
  20. (Set-up Repetitive Invoice Templates)
  21. Daily Processing


Are you interested in learning how to set up Sage 100 Accounts Receivable? Accounting Business Solutions by JCS offers Sage 100 training classes, including how to set up Accounts Receivable in Sage 100.  Our experienced, certified professionals offer a full line of Sage 100 support, training, and data repair. Call us today at 800-475-1047 or email us at solutions@jcscomputer.com today to get started with Sage 100 software today!

X