Sage 50 Accounting – Receiving a Purchase Order flowing through Shipping and Completing a Sales Order – 800-475-1047 – Support – Training – Consultant – Reseller

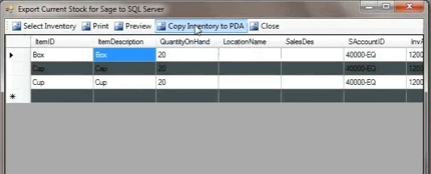
Sage 50 Accounting Bar Code Software and Bar Code Labels

Sage 50 Accounting – Receiving a Purchase Order flowing through Shipping and Completing a Sales Order – 800-475-1047 – Support – Training – Consultant – Reseller

Wondering how Bar Code Software works?  Can your business benefit from using it?  Do you have serialized items you need to keep track of?  We’ve got the details for you.

The following will explain how Bar Code Software works with a handheld device incorporating purchase orders, receiving in purchase orders, applying purchase orders to a sales order and assigning serial numbers to items that include them.

1

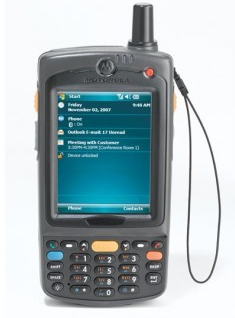
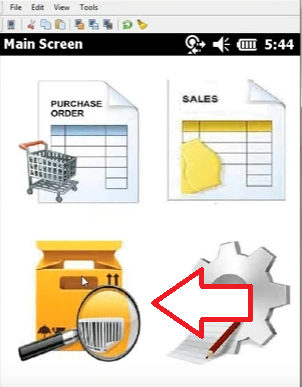
For this demonstration we are using EZ Scan Software with Motorola MC75A handheld

Starting with purchase orders, logged into your company on a handheld device you’ll be prompted to choose a vendor you wish to receive a purchase order in from or the option to choose the purchase you wish to receive in either using the drop down arrow or manually key in the purchase order number with the keypad on the handheld device.  The handheld is programmed to only see open purchase orders.  So if the order has been fully received in, it will not show up as an option on your handheld.  If the purchase order was partially received, the handheld will only give you the options to receive in what is still open.  After choosing the vendor and purchase order number, the system will prompt the date in which you received it or entered it in.  Also on the screen of handheld device is a ‘Receiver #’ space to add the packing ticket or referenced received number in if you choose to reflect on receipt.

12

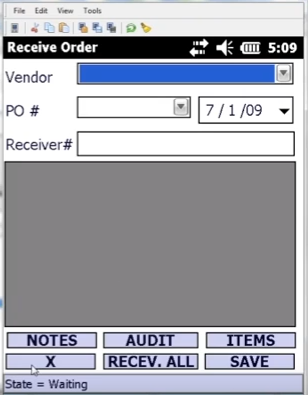
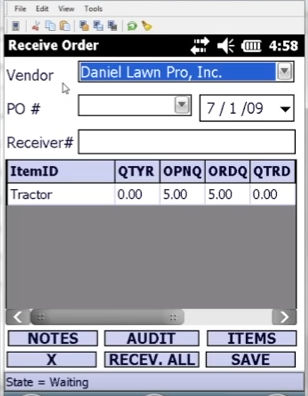
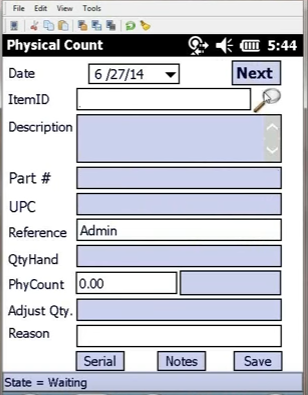
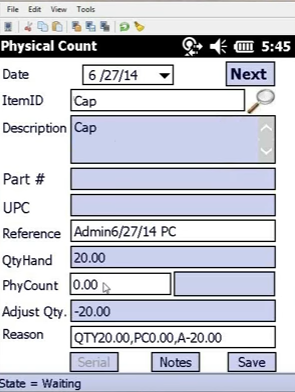
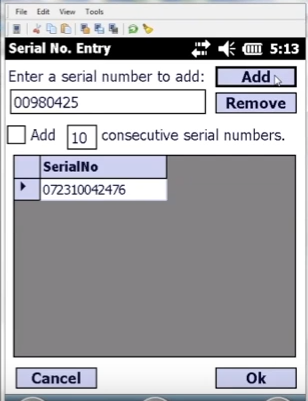
After choosing the vendor and purchase order you wish to receive in, the handheld will display the purchase order just as it is reflected in Sage 50.  You can view the quantities to receive, what is open on the purchase order, how many of that item was ordered, unit of measure for that item, the item description, serialized item or not, and the line number in which the item is listed on the purchase order. You have the option to ‘receive all’ or an option for ‘items’ which allows you to select a certain line item and adjust the quantity received if it does not match the original quantity of the purchase order. There is also an option for ‘notes’ which would be for example “The box was damaged.”  For serialized items that you receive in, select the ‘items’ option, then enter the quantity you wish to receive, then at the top of the screen you’ll see an option for ‘SER.’ Once selected it will open a new window where you can actually scan the barcode of the item and it will add the serial number associated with that item in the field. If you wish to assign your own serial number, you’ll click the box that says ‘ADD’ and blank consecutive serial numbers.

Sage 50 currently does not yet have the ability to direct right into your Sage 50 software, however, there is a utility that runs on your server that transfers the data back and forth between your Sage 50 data and the handheld device. Sage 50 and your handheld device will sync every 5-7 minutes to transfer data back and forth.

The handheld will also give you the option to view sales. Once selected, a new screen will pop up as ‘ship order.’ Select the customer from the drop down menu or key in the customer.  Choose the Sales Order you wish to view with the drop down option or if you know the Sales Order number you wish to view you can key it in.  If there is a Customer Purchase Order number you wish to include on the shipping information you can enter it (from the Sales Order created). There is an option for ‘Ship Via’ to select a shipping method, enter the ‘Ship Date’ and finally you have the option to enter a freight amount.  There is an option to review the bill/ship to information for customers that have more than one location or multiple addresses. There is an option to add notes either on the Statement, a Customer Note, or an Internal Note you can add those as well. Click save and it will bring you back to the Ship Item window.

12

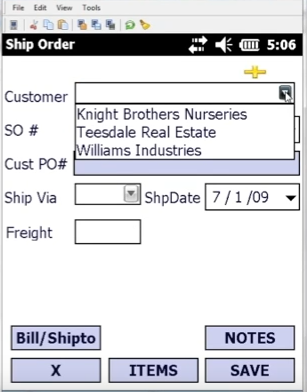
Now we are ready to ship the item. By selecting items the new window will come up for ‘Ship Item’s Detail’ which gives the option to enter in the quantity you wish to ship and assign serial numbers for those items being shipped. Select SER box and that will bring up all the available serial numbers you have available to choose from or select the serial numbers that were scanned in upon receipt of the purchase order. There is an option for ‘Audit’ which you can select to view any open or pending items that have not yet been received/shipped/included on that transaction. Once complete, click save.

3

Back in Sage 50, you can view the open purchase orders to see what’s been received and completed. Same goes for Sales Orders. When the Sales Order is complete and ready to be invoiced, you’ll see on the Sales Order screen a button to view ‘Serial.’ By selecting that, you’ll be able to view the serial numbers of the items for that customer that were packed and/or shipped.

To view this demonstration via webcast, visit

For more information on Sage 50 give one of our professional consultants a call 800-475-1047 www.jcscomputer.com

With over 25 years of accounting and business knowledge as well as proficient technical background you get the training and support your business needs and deserves working with a proficient expert consultant.   You can work with the same consultant to help you master your Sage Software and for those occasional questions you need help with so you can understand best practices and how to manage your company information and books.

Put our 25 years of experience to work for you!

“Your Success is Our Goal”

www.jcscomputer.com          800-475-1047          solutions@jcscomputer.com

Like us on Facebook  and follow us on Twitter

Alabama Alaska Arizona Arkansas California Colorado Connecticut Delaware Florida Georgia Hawaii Idaho Illinois Indiana Iowa Kansas Kentucky Louisiana Maine Maryland Massachusetts Michigan Minnesota Mississippi Missouri Montana Nebraska Nevada New Hampshire New Jersey New Mexico New York North Carolina North Dakota Ohio Oklahoma Oregon Pennsylvania Rhode Island South Carolina South Dakota Tennessee Texas Utah Vermont Virginia Washington West Virginia Wisconsin Wyoming

Physical Inventory Count on Handheld with Bar Codes – 800-475-1047 – Support – Training – Consultant – Reseller

Physical Inventory Count on Handheld with Bar Codes – 800-475-1047 – Support – Training – Consultant – Reseller

What are the Physical Inventory Steps taken and what do they mean?

Physical Inventory is the process where a business physically counts its entire inventory. A physical inventory count may be mandated by financial accounting rules or the tax regulations to place an accurate value on inventory, or the business may need to count inventory so component parts or raw materials can be restocked. Sage 50 Physical Inventory Count provides automation to quickly count inventory and minimize down time for the business.

Inventory Control System Software can speed the physical inventory count process.

Perpetual Inventory system tracks the receipt and the use of inventory then calculates the quantity on hand.

Cycle Counting is an alternative to physical inventory which can result in actual down time for a business.

The following is how to perform a Physical Inventory Count using a Handheld Device (Motorola MC75A and EZ Scan Software) with Inventory Items having Bar Codes.

1

Starting in your Sage 50 software, from the Inventory & Services Screen select Inventory Items and View and Edit Inventory Items. This will populate a new window with your entire inventory.

Next we want to export our inventory items list to our handheld device. Logging into the EZ Scan Software, select Export Inventory from the menu bar. Select Inventory you wish to export. You can export the entire inventory list or a range of items. Once selected a new window will populate with the items you wish to include then you need to Copy Inventory to PDA.

2

You will receive a confirmation of successful completion once the data has been transferred to your handheld device.

Now that your handheld device has the transferred data it is time to view and take action. Select your Inventory Control Module on your device. A warning will notify you that you are about to begin the inventory count process. Click ok and a new window will populate shown below.

34

In the Item ID field choose the item you wish to count. In this example we’ve only chosen a range of items to be physically counted. You will enter in the Physical Count in the PhyCount field.

5

Once completed entering in your Physical Count, click ok on the handheld device. Now the data needs to be transferred back to your Sage 50 data.

From the menu option select Upload from Handled under the Inventory Count Module. Confirmation of the export will prompt you that it was successful. Review the data that you’ve entered by selecting the Physical Inventory Review (Hand Held) from the Inventory Count Module menu. If everything matches up we can import the data back to Sage 50.

From the Inventory Control Module menu, select Import Inventory Adjustment Hand Held.

6

A warning will populate to confirm your selection

Click Yes

Select Import from the menu option

7

Back in your Sage 50 Software, Select Inventory & Services, Perform Inventory Adjustment. Select List from the menu and a new window opens. Select Open on the menu bar and you will now see the transactions that have transferred over from the handheld to Sage 50. Review your adjustments if you’d like to confirm the transfer.

To view this demonstration via webcast visit

For more information on Sage 50 give one of our professional consultants a call 800-475-1047 www.jcscomputer.com

With over 25 years of accounting and business knowledge as well as proficient technical background you get the training and support your business needs and deserves working with a proficient expert consultant.   You can work with the same consultant to help you master your Sage Software and for those occasional questions you need help with so you can understand best practices and how to manage your company information and books.

Put our 25 years of experience to work for you!

“Your Success is Our Goal”

www.jcscomputer.com          800-475-1047          solutions@jcscomputer.com

Like us on Facebook  and follow us on Twitter

Alabam

Sage 50 Inventory Count Using EZ Scan Software in Excel – 800-475-1047 – Training – Support – Consultant – Reseller

Sage 50 Inventory Count Using EZ Scan Software in Excel – 800-475-1047 – Training – Support – Consultant – Reseller

Physical Inventory is the process where a business physically counts its entire inventory. A physical inventory count may be mandated by financial accounting rules or the tax regulations to place an accurate value on inventory, or the business may need to count inventory so component parts or raw materials can be restocked. Sage 50 Physical Inventory Count provides automation to quickly count inventory and minimize down time for the business.

Inventory Control System Software can speed the physical inventory count process.

Perpetual Inventory system tracks the receipt and the use of inventory then calculates the quantity on hand.

Cycle Counting is an alternative to physical inventory which can result in actual down time for a business.

For this demonstration we are using EZ Scan Software and Motorola MC75A handheld device

1

To start the process, log into your EZ Scan software and from the main menu click Inventory Count Module then select Physical Inventory Count. A warning window pops up to let you know you are about to begin the process. Select Yes. This should populate an Export window. Select Options.

2

Next, in the Export Current Items Stock window, make the selection of the items you wish to perform a count on. Can be all of your items, a range of items, or a series of other options.  Once items are selected, click ok and a new window will populate Export Current Stock for Sage with your selections listed.

3

Upon confirmation of your selection, click Move to SQL and Excel from the menu bar.  This will open a new excel window that prompts you to save the file – we recommend a unique name that includes the date and timestamp.  Once your file is saved it will bring you back to the EZ Scan window and let you know if the process was completed successfully.

Open excel, chose the file you just named and exported.  This is the new inventory sheet for a physical count to be recorded on.

4

Enter the new counts and save.

This should take you back to your EZ Scanner Software. Select Upload Excel from the Inventory Count Module.

5

Select the file you just completed and saved with your current physical inventory count.

This will close the window.

In the Inventory Count Module, Select Physical Inventory Review Excel.

6

Verify your excel spreadsheet from the physical count matches what EZ Scan now shows.  If there are changes to be made you can select delete record or if everything matches select close from the menu.

Next you want to Import the changes by selecting Import Inventory Adjustment Excel from the Inventory Count Module Menu.

7

Review the Warning message and once confirmed click yes to proceed.

A final review will open with the option to Import changes.
Open Sage 50, go to Inventory & Services. There you should see the new counts reflected on quantities on hand for the items you adjusted quantities for.

To view this demonstration via webcast visit

With over 25 years of accounting and business knowledge as well as proficient technical background you get the training and support your business needs and deserves working with a proficient expert consultant.   You can work with the same consultant to help you master your Sage Software and for those occasional questions you need help with so you can understand best practices and how to manage your company information and books.

Put our 25 years of experience to work for you!

“Your Success is Our Goal”

www.jcscomputer.com          800-475-1047          solutions@jcscomputer.com

Like us on Facebook  and follow us on Twitter

Alabama Alaska Arizona Arkansas California Colorado Connecticut Delaware Florida Georgia Hawaii Idaho Illinois Indiana Iowa Kansas Kentucky Louisiana Maine Maryland Massachusetts Michigan Minnesota Mississippi Missouri Montana Nebraska Nevada New Hampshire New Jersey New Mexico New York North Carolina North Dakota Ohio Oklahoma Oregon Pennsylvania Rhode Island South Carolina South Dakota Tennessee Texas Utah Vermont Virginia Washington West Virginia Wisconsin Wyoming

X