How to Set Up Sage 100 Purchase Order

Learning how to set up Sage 100 Purchase Order is crucial to your Sage 100 success. Learn how to set up Sage 100 Purchase Order with the certified Sage 100 consultants at Accounting Business Solutions by JCS.


What’s needed to set up Sage 100 Purchase Order

Before using Purchase Order for a new company, you must complete the Purchase Order system startup process. Before beginning the system startup process, gather the following information:

  • Accounts Payable and Inventory Management are set up and operational
  • The general ledger chart of accounts
  • A list of miscellaneous charges you commonly incur, vendor quantity discount rates available for inventory items, all addresses to which you have orders shipped, and landed cost types you track
  • All open purchase orders and back orders are ready to enter
  • All receipts, invoices, returns, and materials requisitions as of your last closed accounting period are ready to enter


How to set up Sage 100 Purchase Order

  1. Enter the Company Code
  2. Enter Accounting Date
  3. Complete Inventory Management Setup
  4. Complete the Accounts Payable Setup
  5. Define Sales Tax Information (if set to track in A/P)
  6. Complete the Purchase Order Setup Wizard
  7. Define Purchase Order Options
  8. Ship-to Address Maintenance
  9. Misc. Charge Maintenance
  10. Landed Cost Maintenance
  11. Vendor Price Level Maintenance
  12. Outstanding P/O Entry
  13. Daily Processing


Are you interested in learning how to set up Sage 100 Purchase Order? Accounting Business Solutions by JCS offers Sage 100 training classes, including how to set up Purchase Order in Sage 100.  Our experienced, certified professionals offer a full line of Sage 100 support, training, and data repair. Call us today at 800-475-1047 or email us at solutions@jcscomputer.com today to get started with Sage 100 software today!

Sage 100 Accounts Receivable Maintenance

Learn how

Sage 100 Accounts Receivable Maintenance with Sage 100 training classes

from Accounting Business Solutions by JCS!

One of the most attractive features of Sage 100 is its flexibility, and the Sage 100 Accounts Receivable module is no exception. Sage 100 Accounts Receivable Maintenance contains a variety of options which can be customize to fit your particular needs.


Division Maintenance


  • GL Accounts are assigned by division
  • All customers must be assigned to a division
  • If divisions are created, they can be set to post to specified GL account segments
  • Use 00 (default) if no divisions are to be tracked


Bank Code Maintenance

  • A is default bank code
  • Bank Code Beginning Balances are entered through Bank Reconciliation


Terms Code Maintenance

  • 00 is default terms code and cannot be deleted
  • During invoice entry, discount amounts are calculated automatically and invoice and discount due dates display based on the assigned terms code.
  • Although terms codes are assigned to customers in Customer Maintenance, you can change them in Invoice Data Entry.
  • You can add new codes automatically using such tasks as Invoice Data Entry and Customer Maintenance.
  • The Minimum Days Allowed field enables the proper calculation of the due date and discount date when the Day of the Month check box is selected.


Sales Tax

  • For calculation of sales tax in AR or SO


  • Sales Tax Class Maintenance


  • Sales Tax Code Maintenance

  • Sales Tax Schedule Maintenance


Sales Tax Account Maintenance


Sales Person Maintenance – Main

  • Options for calculating and tracking commissions are entered in Accounts Receivable Options.
  • A salesperson number and commission rate are assigned to each salesperson. The first two characters of the salesperson number indicate the division the salesperson is assigned.
  • You can assign a default salesperson to each customer in Customer Maintenance; however, you can change the default salesperson when entering transactions in Invoice Data Entry.
  • You can link salespersons to vendors, employees, or account numbers for commission tracking and payment if the Update Commissions to Other Modules check box is selected in Accounts Receivable Options.

– Click Link to establish these links.


Sales Person Maintenance – History

  • Switch View
  • Fix


Payment Type Maintenance


  • A default payment type of CHECK is created automatically and you cannot delete this payment type. CHECK is also assigned to new customers by default.
  • The asset account number defined is debited when the payment posts in Sales Order.
  • For Credit cards, the default transaction method selected determines how to handle the transfer of funds when recording credit card deposits and payments in Sales Order.
  • The accrual account is used to post the estimated accrued expense associated with accepting a credit card for payment. This expense is accrued during the sales journal update process and posts to the account entered at the Accrual Account field.
  • The merchant ID is your ID with the credit card company. This information does not display when receiving credit card deposits.
  • The discount percentage rate, transaction fee, and authorization term are assigned by the merchant bank.
  • Credit card expenses equal the discount percentage plus the per transaction fee.
  • At the Validation Code Length field, enter the length of the validation code sent to the credit card server.
  • Select the Allow Corporate Cards check box to accept corporate credit cards for the selected payment type.


Miscellaneous Item Maintenance

Use Miscellaneous Item Maintenance on the Setup menu in Accounts Receivable or on the Common Information Main menu to identify and track miscellaneous products or services sold and purchased. This task is used primarily if Sales Order or Purchase Order and Inventory Management are not activated for the selected company.

Note: Items created through this task in Accounts Receivable are also available in Common Information and any other module containing the same task.

Miscellaneous Item Maintenance – Main

  • During Invoice Data Entry, item codes are used to automatically display such information as the description, price, and cost for each item sold.
  • The item code determines the posting to General Ledger for the sale of this item code when invoices are updated.
  • The sales tax class selected determines if sales tax is calculated when the item is sold.
  • For items or services sold in quantities, you can display a unit of measure on the customer’s invoice. The user is also prompted for a quantity in Invoice Data Entry.
  • Select the Calculate Commission on Sales check box to calculate commission on this item code when entering transactions in Accounts Receivable.
  • For both Miscellaneous and Charge Item Types, you can define a unit price and unit cost.
  • You can define a sales, cost of goods sold, inventory, and purchases account on the Accounts tab for items assigned to the Miscellaneous item type.
  • For the Charge item type, you cannot enter a unit of measure for item codes assigned to this type and you can only define a sales account and purchases account on the Accounts tab.
  • Select Comment as the item type to enter a comment that you can add to an invoice. For example, you can enter a comment for warranty information or care instructions.
  • Standard Codes M & C are available for one-time entries


Miscellaneous Item Maintenance – Accounts

  • The Cost of Goods Account and Inventory Account fields are only available if the Cost of Goods check box is selected in Accounts Receivable Options.
  • If you selected to post sales by division, the appropriate subaccount segment value is replaced with the value defined for the division assigned to the customer in Division Maintenance.


Miscellaneous Item Maintenance – History


Memo Manager Maintenance

  • Assign security roles to where memo’s can be created / viewed


Are you interested in learning how to maintain Sage 100 Accounts Receivable? Accounting Business Solutions by JCS offers Sage 100 training classes, including how to customize options in Accounts Receivable in Sage 100.  Call us today at 800-475-1047 or email us at solutions@jcscomputer.com today to get started.

Sage 100 Accounts Receivable Options

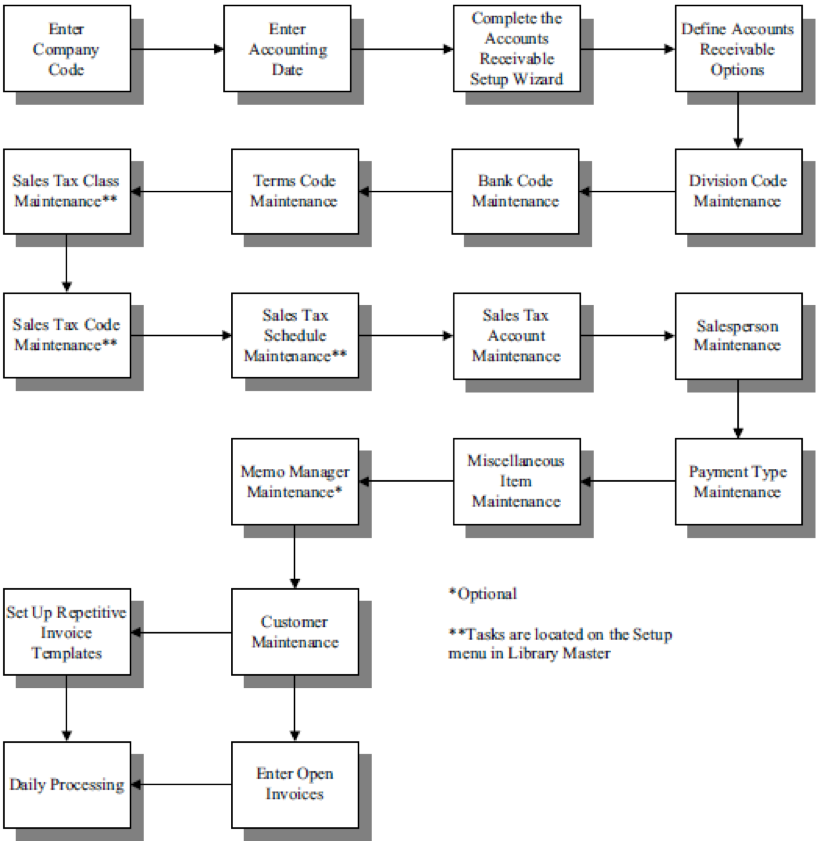
Learn how to use Sage 100 Accounts Receivable Options with Sage 100 training classes from Accounting Business Solutions by JCS!

One of the most attractive features of Sage 100 is its flexibility, and the Sage 100 Accounts Receivable module is no exception. AR in Sage 100 has a variety of customizable options which range from sales tax reporting and aging options to printing and batch processing options. Continue reading to see the various customizable screens in Sage 100 Accounts Receivable.


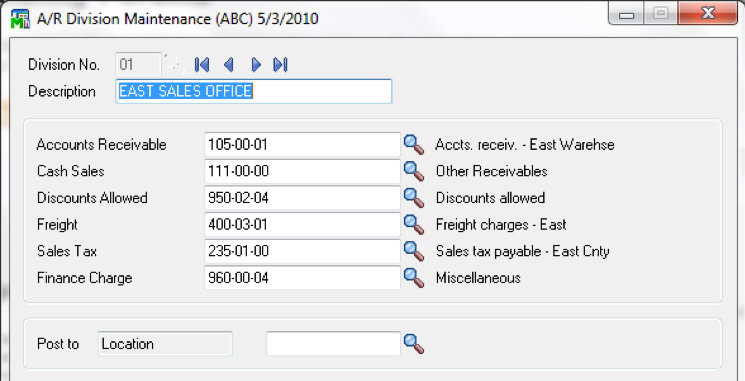
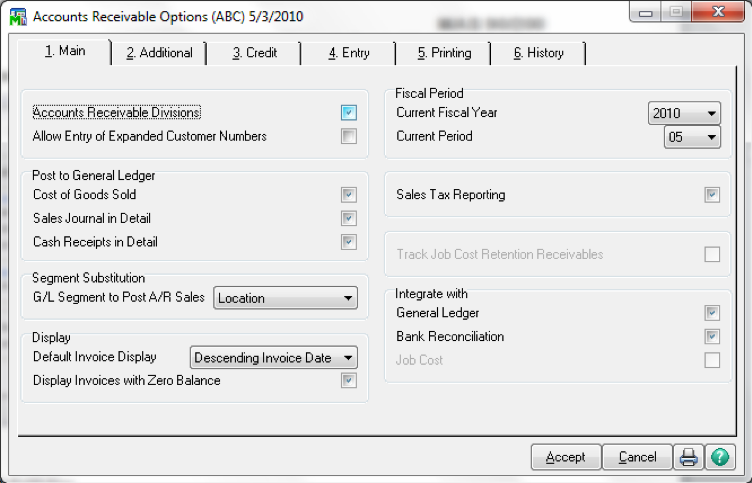
Accounts Receivable Options – Main


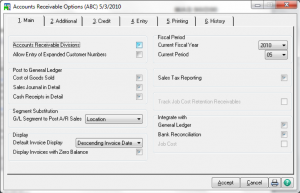
  • Divisions – used for reporting purposes and default posting accounts.
  • Expanding the customer number cannot be undone. Non-graphical forms (legacy modules) do not support expended customer numbers.
  • Posting
  • Segment Substitution by sub-account segment is divionalized.
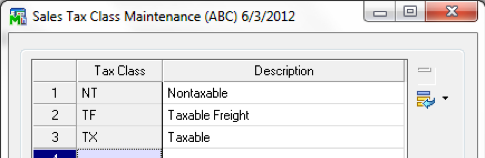
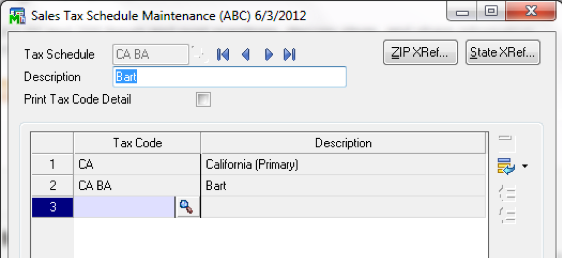
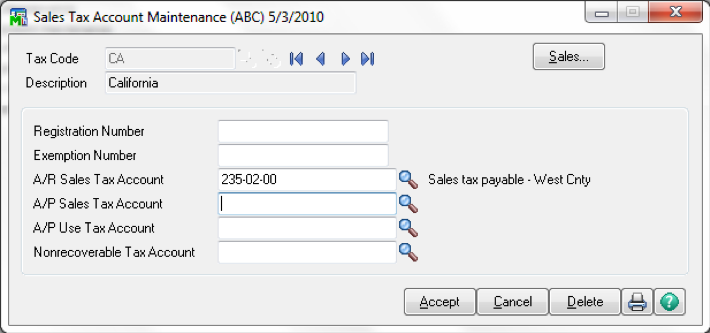
  • Sales Tax Reporting – determines if sales tax is calculated and tracked.
  • Job Cost retention
  • Integration


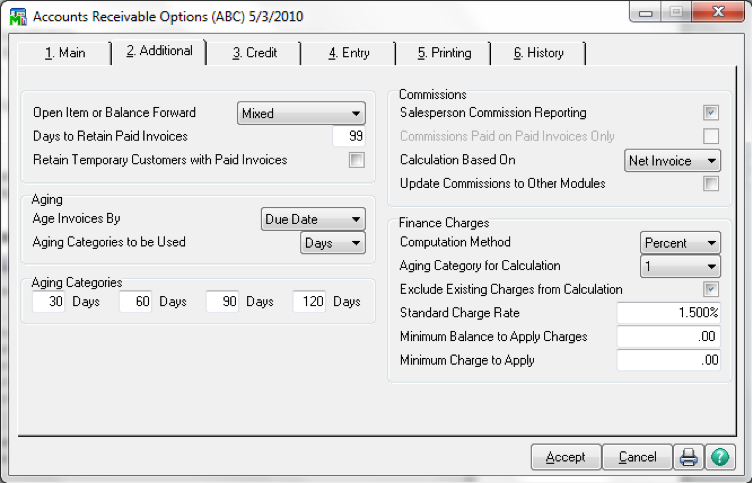
Accounts Receivable Options – Additional


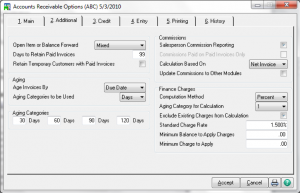
  • Open Item vs Balance Forward.

Open Item: When entering cash receipts, you can apply the payment to a specific invoice and the invoice detail remains in the system.

Balance Forward: During period-end processing, open invoice balances are converted to one balance. When entering cash receipts, the payment is applied to the total amount due for the customer, not to individual invoices. Invoice detail is not retained in the system.

Mixed: Allows you to determine on a customer-by-customer basis in Customer Maintenance if they are Balance Forward or Open Item.

  • Aging – How calculated and catagories.
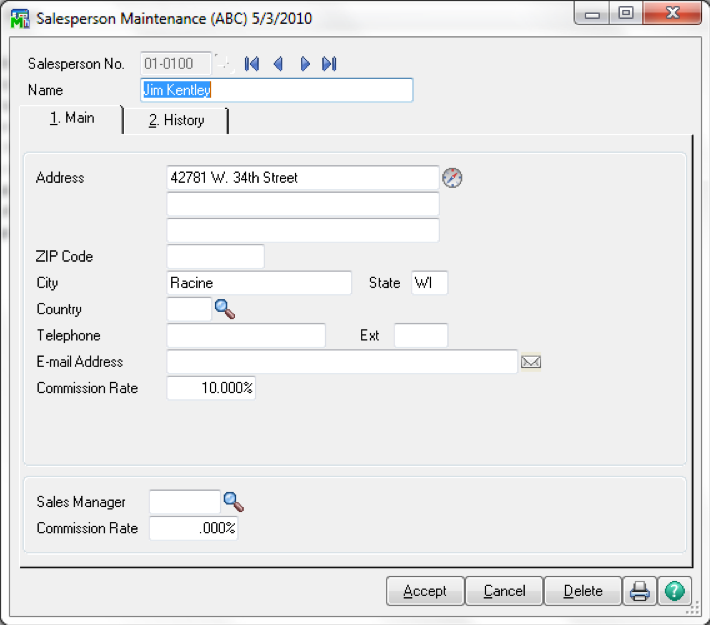
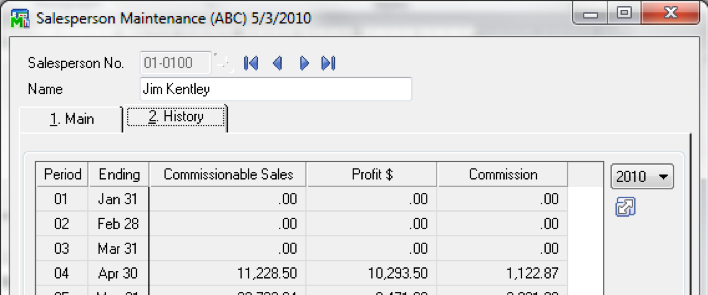
  • Commissions
  • Finance Charges


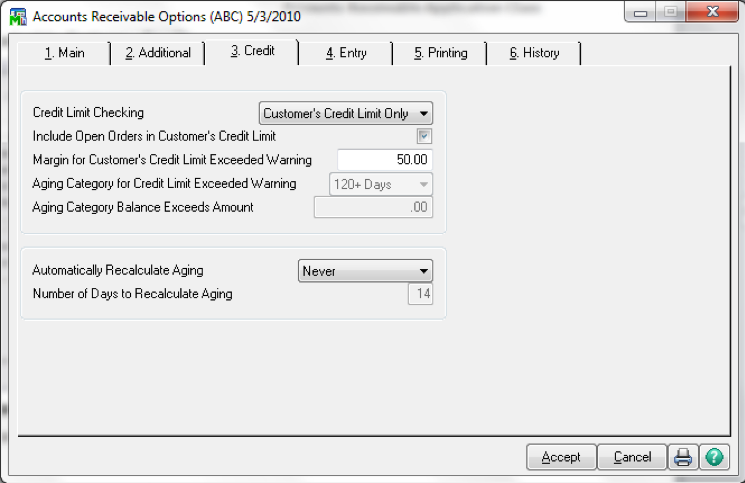
Accounts Receivable Options – Credit


  • Credit limit checking

Select None if you do not want to check the customer’s credit limit when entering transactions.

Select Customer’s Credit Limit Only to have the system compare the customer’s current open invoice balance to the customer’s credit limit or a specified amount. If the open invoice balance exceeds the credit limit or amount defined, a warning displays.

  • At the Margin for Customer’s Credit Limit Exceeded Warning field, you can enter a credit limit margin.
  • If a margin is entered, the customer’s current open invoice balance is compared to their credit limit, if the difference falls within the margin entered, the credit limit warning displays.

Select Aging Category Onlyto have the system compare the customer’s aged invoice balance to the customer’s credit limit or a specific amount you specify. If the aged invoice balance exceeds the credit limit or amount defined, the credit limit warning displays.

  • At the Aging Category for Credit Limit Exceeded Warning field, you determine which aging categories are used when comparing to the customer’s credit limit or specified amount. For example, if you select 90+ Days, the system calculates the total aging balance for all aging categories up to and including the 90+ days aging category.
  • The options available are based on the aging categories defined on the Additional tab.
  • At the Aging Category Balance Exceeds Amount field, you can enter an amount to compare to the aged invoice balance calculated for the customer. If the amount exceeds the amount entered, the credit limit warning displays.

Select Bothto have the system compare both the current open invoice balance and aged invoice balance to the customer’s credit limit.

  • You can define both a margin and determine the aging category to use if Both is selected at Credit Limit Checking field.
  • he system displays a warning if any of the conditions discussed for the Aging Category Only and Customer’s Credit Limit Only options are met.
  • Automatic Recalculate Aging (Never, Always, By Number of Days)

Note: The date the aging information was last recalculated for a customer is maintained in the AR_Customer file.


Accounts Receivable Options – Entry
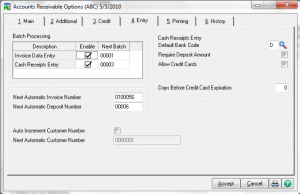
  • Batch Processing
  • Defaults

– If the Require Deposit Amount check box is selected, you are required to enter a total cash and credit card deposit amount in Cash Receipts Entry to be compared against the actual transactions entered.

  • Resets


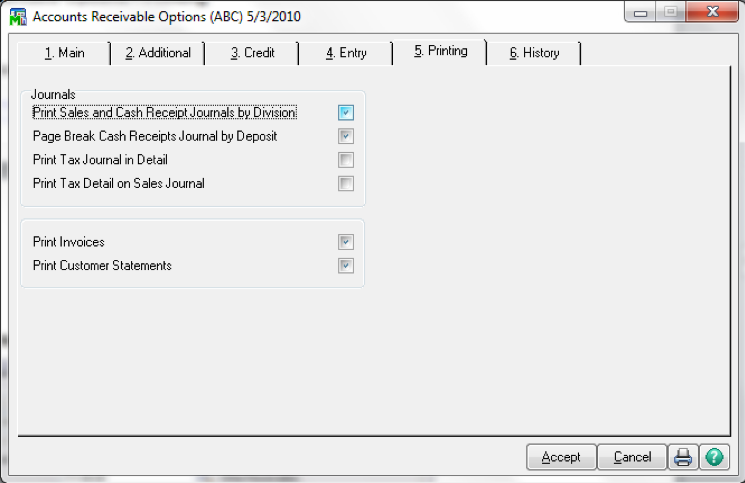
Accounts Receivable Options – Printing


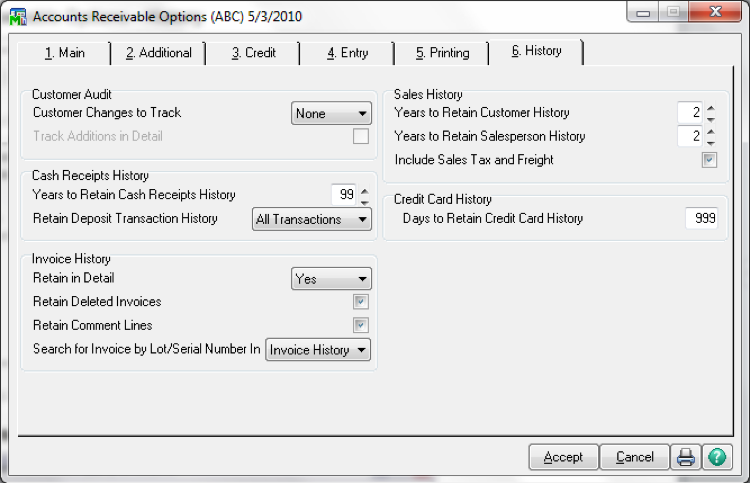
Accounts Receivable Options – History
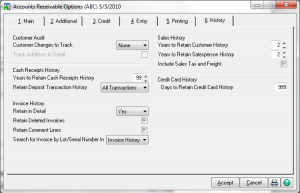
  • Customer Audit
  • Cash Receipts
  • Invoice History

The Retain In Detail field determines if invoice history is retained in detail or summary.

Yes: Select Yes to have the ability to drill down to view invoice information, reprint invoices, and print detailed invoice reports.

Summary: Select Summary to retain information regarding the original invoice amount and payment terms. Detailed information such as the items or services purchased are not retained.

No: Select  No if you do not want to retain detailed or summary invoice history.

  • Sales History


Are you interested in learning how to customize Sage 100 Accounts Receivable? Accounting Business Solutions by JCS offers Sage 100 training classes, including how to customize options in Accounts Receivable in Sage 100.  Call us today at 800-475-1047 or email us at solutions@jcscomputer.com today to get started.

Setting up Sage 100 Accounts Receivable

Correctly setting up Sage 100 Accounts Receivable is crucial to your Sage 100 success. Learn how to set up Sage 100 Accounts Receivable with the certified Sage 100 consultants at Accounting Business Solutions by JCS.


What’s needed to set up Sage 100 Accounts Receivable

Before using Accounts Receivable for a new company, you must complete the Accounts Receivable system startup process. Before beginning the system startup process, gather the following information:

  • Your general ledger chart of accounts
  • A list of states, counties, and local areas to which you report sales tax and their tax rates
  • Your bank account number(s) for the checking account(s) used by Accounts Payable
  • A list of standard payment terms offered to your customers
  • A list of customers, including addresses and phone numbers
  • A list of payments and payment types
  • A list of sales people
  • All open invoices at the time of installation


How to set up Sage 100 Accounts Receivable


  1. Enter the Company Code
  2. Enter Accounting Date
  3. Complete the Accounts Receivable Setup Wizard
  4. Define Accounts Receivable Options
  5. Division Maintenance
  6. (Bank Code Maintenance)
  7. Terms Code Maintenance
  8. Sales Tax Class Maintenance
  9. Sales Tax Code Maintenance
  10. Sales Tax Schedule Maintenance
  11. Sales Tax Account Maintenance
  12. Salesperson Maintenance
  13. Payment Type Maintenance
  14. (Miscellaneous Item Maintenance)
  15. (Memo Manager Maintenance)
  16. Customer Maintenance
  17. Beginning Balance Entry
  18. Open Invoice Entry
  19. Print Invoice Register and Update
  20. (Set-up Repetitive Invoice Templates)
  21. Daily Processing


Are you interested in learning how to set up Sage 100 Accounts Receivable? Accounting Business Solutions by JCS offers Sage 100 training classes, including how to set up Accounts Receivable in Sage 100.  Our experienced, certified professionals offer a full line of Sage 100 support, training, and data repair. Call us today at 800-475-1047 or email us at solutions@jcscomputer.com today to get started with Sage 100 software today!

Period-end processing in Sage 100cloud

Period-end processing in Sage 100cloud

This time of year, period-end processing in Sage 100 is a useful feature to know. Learn how to use period-end processing in Sage 100 with the Sage 100 Accounts Payable training class from Accounting Business Solutions by JCS today!


Utilities & Period-End Processing

  • Remove Temporary Vendors
    • Will only remove vendors with no invoice in retain history range
    • Temporary vendors with 1099 history are not removed
  • Remove Zero balance Invoices
  • Purge Accounts Payable History
    • By date specified
  • Purge Vendor 1099 History
    • Not in current year
  • Purge Sales Tax History
  • Sales Tax Calculation
  • Delete, Merge or Change Vendors
  • Assign Tax Schedules
  • Remove Void Checks


Period-End Processing in Sage 100cloud

  • The following actions are performed when the period is closed:
    • Prompts the user to print the monthly reports
    • Removes zero balance invoices
      • The system checks your selection for number of days to retain paid invoices before they are removed
    • Removes temporary vendors with zero balances unless you selected to retain temporary vendors in Accounts Payable Options
    • Increments the current period in Accounts Payable Options
      • Note: The 1099 calendar year is incremented only after printing and clearing 1099s.Purge General Ledger History (manually)


To learn more about period-end processing in Sage 100, call the Sage 100 experts at Accounting Business Solutions by JCS today at 800-475-1047 or email us at solutions@jcscomputer.com. Our experienced Sage 100 consultants offer Sage 100 training classes, including how to use period-end processing in Sage 100 ERP, Sage 100 Manufacturing, and Sage 100cloud.

Sage 100 Accounts Payable Reports

Sage 100 Accounts Payable Reports are a useful tool included in your Sage 100 software. Here, we explain the names and purpose of each A/P report in Sage 100.


1099 Vendors

  • 1099 eFiling and Reporting
  • Form 1099 Printing
  • 1099 Reports
    • Payment History Report by Vendor Number
    • Select the 1099 information box on the AP Trial Balance before closing each month
    • Distribute to GL acct

Vendor Reports

  • Vendor Listing
    • The Vendor Listing report to produce a list of vendors and related information, such as constant data, balance data, memos, and 1099 payment history.
  • Vendor Listing with Balances
    • The Vendor Listing with Balances report is similar to the Vendor Listing report. The report lists vendor information and the period-to-date, year-to-date, and prior year totals on the Summary tab in Vendor Maintenance.
  • Vendor Mailing Labels
    • The Vendor Mailing Labels report prints vendor names and addresses on perforated labels. Options available include:
      • Form codes to align and format labels to fit your needs
      • Multiple label printing for each vendor
  • Vendor Memo Printing
    • The Vendor Memo Printing report prints information entered on any existing memos for one or more vendors.
      • Select the Print Memo Detail check box to include the actual memo text.
      • If this check box is cleared, only the memo ID, description, date, expiration date, reminder start date, reminder stop date, and auto display setting appears on the report.
  • Vendor Audit Report
    • The Vendor Audit Report provides information on changes, deletions, or additions to vendor information. This report is only available if you selected to track changes in Accounts Payable Options.


AP Transaction Reports

  • Vendor Inquiry
    • Use Vendor Inquiry on the Main menu to quickly review or display information for a specific vendor without the ability to make changes.
    • Uses the same tabs and information accessible in Vendor Maintenance.
  • Invoice History Inquiry
    • Use Invoice History Inquiry on the Main menu to view detailed or summary invoice information including invoice header and general ledger distribution detail.
    • Invoice History Inquiry is also accessible by selecting an invoice on the Invoices tab in Vendor Maintenance or Vendor Inquiry.
      • This task is available only if the Track Detailed Invoice/Payment History check box is selected in Accounts Payable Options.
  • Payment History Inquiry
    • Use Payment History Inquiry on the Main menu to view information for all checks entered in the system.
    • Payment History Inquiry is also accessible by selecting a check on the Checks tab in Vendor Maintenance or Vendor Inquiry.
      • This task is available only if the Track Detailed Invoice/Payment History check box is selected in Accounts Payable Options.
  • Accounts Payable Check History Report
    • The Accounts Payable Check History Report on the Reports menu provides a recap of all checks printed for a specified period. You can also view all manual or voided checks for the same specified period.
  • Accounts Payable Trial Balance Report
    • The Accounts Payable Trial Balance Report on the Reports menu provides a complete recap of Accounts Payable balances as of the last day of the month. This is the suggested report for reconciling to General Ledger. The detail on this report includes:
      • Invoices, payments, and adjustments
      • Other activities which affect Accounts Payable balances
      • This report is based on the posting date and it is the suggested report for reconciling to General Ledger
  • Accounts Payable Invoice History Report
    • The Accounts Payable Invoice History Report on the Reports menu provides a summary or detailed listing of each invoice posted.
    • This report is available only if you selected Yes or Summary at the Retain in Detail field in Accounts Payable Options.
    • Line item detail information is also provided for each invoice if you selected Yes at the Retain in Detail field in Accounts Payable Options.
  • Payment History Report
    • The Payment History Report on the Reports menu provides a detailed listing of each check including the check number, check date, vendor number, vendor name, invoice number, invoice amount, and check amount.
    • You can sort the report by check number, vendor number, or vendor name.
    • You have the option of including all or a range of vendors, checks, and check dates.
  • General Ledger Posting Recap
    • The General Ledger Posting Recap report on the Reports menu provides a detailed recap, by general ledger account, of all postings made from Accounts Payable.
      • Note: The Invoice Register, Check Register, Manual Check Register, and Daily Transaction Register are used to track transactions you have not updated.
  • AP Expense by GL Account Report
    • The AP Expense by GL Account Report on the Reports menu produces a report displaying each invoice posted by general ledger account number.
    • Information on the report includes: vendor number, vendor name, invoice number, invoice date, invoice status, source journal, transaction date, and distribution amount, and last check number.
      • The report can include only paid invoices, open invoices, or all invoices.
      • You can choose to print the report for a range of account numbers, vendors, transaction dates, departments, and locations.
  • Open Invoice by Job Report
    • The Open Invoice by Job Report on the Reports menu provides you a detailed listing, sorted by job number, of all open invoices distributed to a job. Each job cost distribution is printed in detail and sorted by job number, cost code, and cost type.
      • Only available if Job Cost is activated.
  • Accounts Payable Sales Tax Report
    • The Accounts Payable Sales Tax Report on the Reports menu provides you with a recap of sales tax information.
    • You can print this report in a summary or detailed format and includes taxable purchases, nontaxable purchases, taxable freight, nontaxable freight, taxable tax,exempt purchases, recoverable/nonrecoverable amount, and sales tax/use tax amount for each tax code.
    • The accumulated sales tax collected prints for each tax code and primary tax code.
      • Note: This report is available only if the Sales Tax Reporting check box is selected in Accounts Payable Options.


Management Reports

  • Monthly Purchase Report
    • The Monthly Purchase Report provides you with a recap of PTD purchasing activities entered in Accounts Payable. You should print this report before closing the period.
  • Vendor Purchase History by Period
    • The Vendor Purchase History by Period report provides vendor purchase history information by period for a specified fiscal year.
    • A total for each division prints along with a report total except when sorting by total purchases or total payments.
    • Information for each division prints on a separate page if the Accounts Payable Divisions check box is selected in Accounts Payable Options.
  • Vendor Purchase Analysis
    • The Vendor Purchase Analysis report provides a recap of total purchases, payments, discounts taken, and discounts lost.
    • You can select which fiscal year and period to include on the report.
    • You can also determine if period-to-date, year-to-date. and prior year totals are provided for the period and year selected.
  • Accounts Payable Analysis
    • The Accounts Payable Analysis report provides a graphical representation of Accounts Payable. The report provides:
      • A statistical summary of payables activity
      • An aging recap for up to six consecutive periods
  • Accounts Payable Analysis Report
    • The Accounts Payable Analysis Report provides you with an in-depth management report consisting of an aging recap and statistical summary of payables activity for up to six consecutive periods.


For more information regarding Sage 100 Accounts Payable Reports, call Accounting Business Solutions by JCS today at 800-475-1047 or email us at solutions@jcscomputer.com. Our certified Sage 100 consultants offer Sage 100 training classes, including how to use Sage 100 Accounts Payable reports.

Sage 100 Payment Processing

Sage 100 Payment Processing is an important component of the Sage 100 Accounts Payable module which allows you to write and print vendor checks. Learn how to use Sage 100 Payment Processing today!


What to Pay

  • Account Payable Aged Invoice Report
    • The Accounts Payable Aged Invoice Report provides a detailed list of paid and outstanding invoices. When printing the report, you have a choice of including just paid invoices, outstanding invoices, or both. You also have a choice of including one or all of the aging categories defined in Accounts Payable Options. You can age invoices by the invoice date or the due date.
  • Cash Requirements Report
    • The Cash Requirements Report provides a summary of outstanding invoices and total cash requirements for any three consecutive periods. This report provides the necessary data to analyze future cash needs and effectively plan cash flow on a weekly, monthly, or quarterly basis, depending on the period-ending dates entered.

Selecting Invoice for Payment

There are two tasks available on the Check Printing menu allowing you to select invoices: Invoice Payment Selection and Check Maintenance.

Invoice Payment Selection

  • If the Always Take Discounts check box is selected, discounts are taken even if expired.
  • At the Vendor’s Balance Due field, you can select invoices to pay based on the vendor’s balance. For example, you can select invoices for vendors with balances due greater than or equal to a dollar amount you define.
  • Click Proceed to select invoices based on the criteria defined. You can modify or delete the selected invoices in Check Maintenance. Invoices are notselected for vendors on hold.
  • You can make additional selections by changing the criteria and running this task again.
  • Click Clear to undo the invoice selection. This button is enabled as a security event.
  • Print the Invoice Payment Selection Register to list all invoices selected for Payment.


Check and Electronic Payment Maintenance

  • To add, modify or delete selections made in Invoice Payment Selection
  • To manually make selections
  • Credits can be selected to reduce the payment amount


Printing Checks

  • Checks printed one bank at a time
  • Extended Stub report
  • Check Register
  • Checks can be reprinted if they have not yet been updated


Manual Check Entry

  • Can be printed using Quick Print
  • Enter prepayments
  • Reverse checks or void unused checks
  • Apply credit memos to invoices

– Enter APP followed by a user-defined number & set amount to zero

  • Record a purchase or payment by credit card
  • Combine invoices for credit card vendors into one invoice

Manual Check Entry – Header

  • Next Check # button vs Quick Print button

– enter NOF for vendors not on file


Manual Check Entry – Lines

  • Distribute to invoices, DM’s or CM’s
  • Enter unique invoice code to record a prepayment (eg. PP43004)
  • Distribute to GL acct


Manual Check Entry – Credit Card Vendors

  • When recording the payment to the credit card vendor, you can use the purchase and invoice transfer options discussed in Invoice Data Entry.

– For example, you can enter a payment to the credit card vendor for purchases already entered for a purchase vendor.

  • To record a purchase or invoice transfer, you must enter a new invoice number on the Lines tab. Selecting an existing invoice does not allow you to record a purchase or invoice transfer.

– The Transfer button is added to the G/L Distribution window. The options available for transferring are the same as seen when recording purchase and invoice transfers inInvoice Data Entry.

  • You can also combine invoices for the monthly credit card statement for your credit card vendor into one invoice.
  • When printing the Manual Check Register, invoice and purchase transfers have TRANSFER FROM or TRANSFER TO in the CHECK NO./INVOICE NO. columns. The vendor and the word TRANSFER appear in the CHECK/INV DATE columns and G/L ACCOUNT columns respectively.

Manual Check Entry – Reversals

  • When reversing a check, enter all amounts as negative numbers.
  • If the G/L Distribution check box is selected on the Lines tab, you can reverse the check and the expense without reopening the invoice.
  • If the Track Detailed Invoice/Payment History check box is selected in Accounts Payable Options, you have the option of automatically adding the invoices originally paid on the Lines tab.
  • Click Yes when asked if this is a check reversal to continue with the check reversal process or click No to return to the Manual Check Entry window.
  • Click Yes when asked, to have the invoice(s) originally paid automatically added to the Lines tab.
  • Click No to manually select the invoices on the Lines tab.
  • Only the invoices still on file are automatically recalled on the Lines tab.
  • A dialog box displays the invoices you can recall.


Manual Check Entry – Voiding Used Checks

  • Just enter zero in the amount field and you will be asked if this is a void.

Manual Check Entry – Applying Negative Invoices

  • To use the Apply option, enter APP followed by a user-defined number at the Check No. field.
  • The check amount is automatically set to zero and you cannot change the amount.
  • When updating the manual checks, the Check History Report, 1099 Form, and Bank Reconciliation will not include the zero-amount check.


Are you interested in learning Sage 100 Payment Processing? Accounting Business Solutions by JCS offers Sage 100 training classes, including how to use Sage 100 Payment Processing.  Call us today at 800-475-1047 or email us at solutions@jcscomputer.com today to get started.

Sage 100 Accounts Payable Transaction Processing

Sage 100 Accounts Payable Transaction Processing is a useful tool included in your Sage 100 software which can help you track your A/P expenses. Learn how to utilize Sage 100 Accounts Payable Transaction Processing with Sage 100 training classes from Accounting Business Solutions by JCS today!


Entering Invoices

  • Batch Window

A/P Invoice Data Entry – Header

  • Click Vendor or the Vendor No. link to access Vendor Maintenance to make changes or inquiries during Invoice Data Entry and to add a new vendor.
  • Select the Hold Payment check box to place the invoice on hold.
  • Sales tax is calculated if the Calculate Sales Tax in A/P Data Entry check box is selected in Accounts Payable Options.
  • For invoices with the Use Tax check box selected, the balance owed to the vendor is only for the invoice amount.
  • The use tax amount posts at the time the invoice posts. The amount of the use tax is credited to the use tax account and debited to the accounts payable sales tax account.

A/P Invoice Data Entry – Header

  • If the vendor is assigned a default general ledger account in Vendor Maintenance, the full amount of the invoice is automatically distributed to this account.
  • The accounts entered on this tab generally indicate the debit side of the journal entry; however, you can credit an account by entering a negative amount.
  • The distribution balance must equal .00 before completing the update process.
  • Transactions entered do not post until you print and update the Invoice Register.


Credit Card Invoices

When entering an invoice for a credit card vendor, you have the option of recording a purchase or invoice transfer. You can also combine invoices into one invoice for the same credit card vendor.

  • Purchase transfers – Use to transfer the purchase amount from the credit card vendor to the purchase vendor (vendor from whom you purchased) to track 1099 and payment history.

– Payment history is recorded for both the purchase vendor and the credit card vendor.

– Purchase transfers are only used if the amount entered was not previously recorded in the system.


  • Invoice transfers – Use to transfer a balance from the original purchase vendor’s Invoice to the credit card vendor’s invoice. This is used in cases where you entered an invoice for a vendor and subsequently paid the invoice using a credit card.


  • Combining invoices – Use to combine invoices for the monthly credit card statement for your credit card vendor into one invoice.

– Combine invoices if you performed a large number of invoice and purchase transfers throughout the period but want to print one invoice (the entire statement amount) on the check stub.

  • Header Tab
  • Lines

Entering Debit & Credit Memos

  • Defined by appending –DM or –CM to reference number
  • Enter Credit Memos using negative amounts
  • Can be applied to invoices using manual check entry.

Updating Invoices and Posting the Daily Transaction Register

Adjustments

  • To change information on an already posted invoice
  • Adjust amount
  • Delete
  • Change Hold or Separate Check status or Separate Check

  • To reduce the amount of the invoice, enter the amount as a negativenumber. To increase the amount, enter the amount as a positive number.
  • To delete an invoice, enter the balance of the invoice as a negative amount. This adjusts the balance to zero. Zero balance invoices are removed using Period End Processing.


Repetitive Invoices – Header

  • The Select Cycle field is user defined and used as part of the selection process.
  • Enter the total number of payments to make at the Number of Payments field.
  • Click Print to print a list of the repetitive invoices created. Use the report as a reference for selecting invoices for processing.
  • At the Comment field, enter a comment to print on the check stub and check register.


Repetitive Invoices – Lines

  • Lines – same as invoice entry


Repetitive Invoices – Invoice Selection

  • The selection date entered is compared to the number of billings and the start billing date for each repetitive invoice to determine which are selected.
  • After repetitive invoices are selected, you can view and modify them in Invoice Data Entry.
  • Combining the reference and the invoice date entered in this window automatically generates the invoice number.
  • After updating a repetitive invoice, the billed to date, unbilled balance, date last billed, and times billed is updated in Repetitive Invoice Entry.
  • If you previously selected repetitive invoices by mistake or with the incorrect selection criteria, click Clear to clear the selections.

Use Allocation Entry In G/L to Redistribute Expenses

  • Headers

– Source

– Method (pct, qty, basis)

– Cycle

– Amount (activity, balance, manual)

  • Lines

– Masking


Are you interested in learning Sage 100 Accounts Payable Transaction Processing? Accounting Business Solutions by JCS offers Sage 100 training classes, including how to process Accounts Payable transactions in Sage 100.  Call us today at 800-475-1047 or email us at solutions@jcscomputer.com today to get started.

Sage 100 Vendor Maintenance


Vendor Maintenance – Main

  • Address line 3 is available and only printed on forms if data is entered and you are not using the preprinted form setting.
  • If the Hold Payment check box is selected, outstanding invoices for this vendor are not automatically selected during Invoice Payment Selection.
  • Selecting the Exemption No. on File check box indicates you have provided tax exemption numbers to your vendor.
  • The sales tax schedule selected at the Tax Schedule field is used for tax calculations and is available only if the Sales Tax Reporting and Calculate Sales Tax in A/P Entry check boxes are selected in Accounts Payable Options.
  • You can change sales tax information when entering transactions.
  • The Tax Class field represents the default tax class to use when entering transactions.
  • If the Credit Card Vendor Checkbox is selected, you can perform credit card transfers to and from credit card vendors in Invoice Data Entry and Manual Check Entry.


Vendor Maintenance – Additional


  • Select the Use P/O Receipt of Invoice Entry for this Vendor check box to enter invoice information for the vendor in Purchase Order Receipt of Invoice Entry. Clear this check box to enter the invoices in Accounts Payable.
  • The system tracks payments made to the vendor and produces a 1099 form for Miscellaneous Payments, Interest Payments, and Dividend Payments printed at year end.
  • The 1099 form information is available only if the 1099 Reporting check box is selected in Accounts Payable Options.

Vendor Maintenance – Statistics

  • The Aged by Invoice Date information is based on the system date and is different from the aging information on the Invoices tab.
  • Information updates as you process transactions.
  • Theability to access and change data on this tab is controlled by a security event.


Vendor Maintenance – Summary


Vendor Maintenance – History


  • You can switch between history views
  • With correct security settings, you can ‘Fix’ this information.


Vendor Maintenance – Invoices

  • You can turn off the display of zero balance invoices
  • You can search for specific information.
  • You can drill down on detail that has not been purged.


Vendor Maintenance – Transactions


Vendor Maintenance – Checks

  • The Payment History button is available only if the Track Detailed Invoice/ Payment History check box is selected in Accounts Payable Options.


Vendor Maintenance – P/Os


Vendor Maintenance – Other

  • Copy From
  • Renumber – Cannot use for vendors with purchase history records or up-printed / un-cleared checks
  • Items Button – to view receipt and return history for a specific item and to define aliases and pricing structure information specific to this vendor.
  • Contacts Button
  • Purchase Address Button – to set up and maintain one or more purchase addresses for a Vendor. Requires Integration with P/O
  • Remit To Address Button

– To print on check requires form modification

– Currently not usable with ACH

  • Electronic Payment Button


Are you interested in learning Sage 100 Vendor Maintenance? Accounting Business Solutions by JCS offers Sage 100 training classes, including how to use Sage 100 Vendor Maintenance.  Call us today at 800-475-1047 or email us at solutions@jcscomputer.com today to get started.

Sage 100 Accounts Payable Data Conversion

Sage 100 Accounts Payable Data Conversion

From another System

Gather the appropriate information and follow these steps:

  1. Gather all unpaid invoices as of your last closed accounting period.
  2. Run a report from your current system or prepare an adding machine tape totaling the invoices. This amount should equal the account balance for the accounts payable account(s) in General Ledger.
  3. Set the accounting date to the last day of the last closed accounting period. This is the current period established in Accounts Payable Options.
  4. Enter 1099 payments in the current calendar year.
  5. In Invoice Data Entry, enter the outstanding balance amounts for each invoice using the original invoice dates. During the distribution process, post the entire distribution balance to your accounts payable account number in General Ledger.

Note: Do this when you have expensed these invoices in the previous system.

  1. Print the Invoice Register from the Main menu. The total should equal the balance of the accounts payable account in General Ledger.
  2. Update the Invoice Register and the Daily Transaction Register.
  3. Run Full Period End Processing to clear the month-to-date purchases fields and forward to the next period.
  4. Reset the accounting date to the first day of the current accounting period.

Linking Accounts Payable to Accounts Receivable

  • Vendor / Customer Link Maintenance
  • AP form AR Clearing Selection
  • AP form AR Clearing Entry
  • AP form AR Clearing Register

Are you interested in learning about Converting Accounts Payable to Sage 100 from Another System? Accounting Business Solutions by JCS offers Sage 100 training classes, including Converting Accounts Payable to Sage 100 from Another System.  Call us today at 800-475-1047 or email us at solutions@jcscomputer.com today to get started.


X