Barcode Sage 50

Barcode Sage 50

EzScanIT Barcode for Sage 50 includes barcode labels. Easily print barcode labels for inventory items and more.

Barcode Sage 50 is the EzScanIt and has Shipping capabilities for Sage 50 Sales Orders, receiving for Sage 50 purchase orders, Along with physical inventory including variances and the ability to print Sage 50 inventory item labels and you can print Sage 50 inventory labels for one, multiple or all of your inventory items.

Search Faster, Better & Smarter using the add on for Sage 50 that includes a Barcode Scanner. Once you add your Sage 50 inventory items, customers and vendors you are ready to rock and roll. If you are a Sage 50 user this is a familiar process. As soon as you add sales orders and purchase orders they will transfer to the Motorola handheld device.

After a purchase is received the waiting on a bill purchase is sent to Sage 50 and after a sales order is shipped an UN-printed sales invoices is sent to Sage 50. These transactions will wait for you in Sage 50 until you are ready to convert them to a parables invoice or print your customer sales invoice.

The EzScanIt barcode label printing module can print most barcode label sizes. You can print multiple labels for a single item, print multiple item labels or you can print barcode labels for all your inventory items. Most of the time these can be customized to work with your existing labels using our specified Zebra printer.

We hope this helps you understand the Barcode EzScanIt Sage 50 label print program. For more information give us a call Accounting Business Solutions 800-475-1047 or visit www.jcscomputer.com. We look forward to speaking with you soon.

View a brief demo using the add on for Sage 50

Sage Timeslips Support

Accounting Business Solutions, Accounting Business Solutions by JCS, JCS Computer Resource, JCS, JCS software, sage 100, quickbooks, sage 50, MISys, Sage 100 manufacturing

Sage 50 Scanner

Sage 50 Scanner

Sage 50 Scanner is easy to start & easy to use. Time-Saving Sage 50 Barcode Scanning Solution For Small Businesses. Spend Less Time Capturing, Managing, & correcting your inventory data so you can get back to work. Give us a call for a Free discovery and demo.

Do you need Sage 50 Barcode labels? EzscanIT for Sage 50 can help you easily print barcode labels for inventory items and more.

EzScanIt includes:

The ability to ship existing Sage 50 sales orders and automatically record them as un-printed customer sales invoices.

You can receive Sage 50 purchase orders and have them recorded as Vendor ‘waiting on a bill’ purchases

During the physical inventory count take some or all of your items to a handheld device to easily automate your count process. Once the variance report is generated and reviewed inventory adjustments are sent to Sage 50. As a result, the Sage 50 quantity on hand will agree with the actual physical count.

Print Sage 50 barcode labels for one, multiple or all of your inventory items

If you are a Sage 50 user this is a familiar window showing the inventory item list. You simply launch a barcode label generator and define which items you want to print barcode labels for.

The EzScanIt barcode label printing module can print most barcode label sizes. You can print multiple labels for a single item, print multiple item labels or you can print barcode labels for all your inventory items.

We hope this helps you understand the EzScanIt Sage 50 barcode label print program. For more information give us a call Accounting Business Solutions 800-475-1047 or visit www.jcscomputer.com. We look forward to speaking with you soon.

View the Sage 50 Scanning Solution

Sage Timeslips Support


Sage 50 Job Cost

Sage 50 Job Cost

Sage 50 Job costing is all about tracking and accumulating the costs of a job so you know if you are making money. Good examples of who can use jobs to track expenses are construction, make to order machines, contractors who build or manufacturing a small batch of repetitive products. These expenses can include material, labor, outside services as well as other types of costs that are needed to complete your job.

Using Job Costing software, the right way can also help you make sure the entire job is invoiced during and towards the end of a project. Staying on budget is always at the top of the list during the progression of a job. In addition, you can calculate how much profit you made on a job. Using Sage 50 for this is very simple to do

Job Costing can give you the information you need to manage your jobs as they are in progress so you do not get surprised when the job is completed. Set up jobs, budgets and labor overhead. Track subcontractor insurance expiration dates and retainage along with change orders. Sage 50 Job Cost is easy to set up and easy to maintain. You can even report on certified payroll with a 3rd party add on. This is the punch list of topics we can help you understand how to use. Sage 50 Job Cost Support Training

How to set up Sage 50 Job Cost Default Information

  • Job Costing Defaults
  • Track Retainage and Burden
  • Categorize Costs by Phase and Cost Codes

How to set up Sage 50 Jobs

This is the order in which you need to add your base job information – found under maintain Jobs.

  1. Cost Codes – lowest level and can be used to break down phase codes
  2. Phase Codes – middle level and can be used to break down jobs
  3. Job numbers – the id by which you will identify your jobs

Sage 50 Jobs can also include the following information:

  • Job Start Date
  • Job End Date
  • Job Location
  • How to add phase codes estimated revenue / expenses
  • How to add cost codes estimated revenue / expenses
  • Add/Modify/Delete/Inactivate Jobs
  • Subcontractors Insurance and expiration dates
  • Create Job Estimates or Budgets
  • Change Job Numbers
  • Recording Job Activity
  • Track Change Orders with revenue and costs
  • Issue Inventory to a Job
  • Payroll Labor Hours from Payroll or Time Tickets
  • Record Overhead
  • Issue Purchase Orders to a Job
  • Record Direct Expenses to a Job

How to Bill Sage 50 Job Cost

Put our 30 years of Sage 50 Job Costing experience to work for you.

Give us a call 800-475-1047 or visit www.jcscomputer.com


Sage 50 job cost support training Sage 50 Job Costing

Sage 50 job cost support training Sage 50 Job Costing


#sage50jobcost, #sage50jobcosting, #sage50jobcostsupport, #sage50jobcosttraining, #sage50job, #sage50jobs, #sage50jobcostinfo

Timeslips Software Support

QuickBooks Consolidated Financials

QuickBooks Consolidated Financial Statements

What is QuickBooks Consolidated financials?

A set of QuickBooks Consolidated Financial Statements consists of reports that show the operations, cash flows, and financial position of a parent company and each individual subsidiary. You can easily print each companies’ financial statements from your QuickBooks Company files. To get consolidated financials from multiple QuickBooks company data files you need to have a set of consolidated reports capable of easily combining them.

These financial statements include assets, liabilities, equity, income, expenses and cash flows. The balance in individual accounts from each subsidiary are totaled and presented in a single total and as a single economic entity

The top 3 reasons to have QuickBooks Consolidated Financials at your fingertips?

Consolidate – add up financial information from multiple companies with accurate totals

Standardize – to present professional financials with consistent formatting

Automate – set them up and use them over and over again with the click of a button

What financial statements can be consolidated?

standard balance sheet

income statement

cash flow statements

Other statements

Who looks at consolidated financials?

Bookkeepers

Individual Owners

Holding Company Controller

Board of directors

Financial Institutions

Tips and tricks for consolidated financials

Each company should be on the same fiscal year

The chart of accounts needs to be standardized across all companies

All entries should be recorded in the individual companies prior to generating consolidated statements

Presentation of individual and consolidated statements should be in the same format

Advanced Reporting for QuickBooks

How do I print QuickBooks Financial Statements?

  • Start QuickBooks
  • From the Reports menu
  • choose Company & Financial
  • then choose the desired QuickBooks Financial Statement
  • On the Display tab
  • change the date range to 12 months
  • (for example, select Last Fiscal Year in the Dates drop-down)
  • Change the Columns drop-down from ‘Total only’ to ‘Month.’

How do I print QuickBooks Financial Statements to PDF?

  1. Select the report or form you want to print in QuickBooks
  2. Click the “File” menu
  3. Select “Print” to use a third-party PDF printer
  4. Then, select your PDF printer from the options

Alternatively, select “File” and “Save as PDF” to use the built-in QuickBooks PDF printer.

How do I print QuickBooks Financial Statements to excel?

  1. Click on the Reports menu.
  2. Choose Company & Financial.
  3. Select either Profit and Loss by Class or Balance Sheet by Class.
  4. Choose the Dates.
  5. Click on the Excel button.

How do I print the QuickBooks Balance Sheet?

  • Start QuickBooks
  • From the Reports menu
  • choose Reports
  • Company & Financial
  • Balance Sheet Standard
  • On the Display tab
  • change the date range to 12 months
  • (for example, select Last Fiscal Year in the Dates drop-down)
  • Modify the Columns drop-down from ‘Total only’ to ‘Month.’

How do I customize the QuickBooks Balance Sheet?

You can customize your Balance Sheet report to show Year-over-Year columns.

  1. Go to Reports.
  2. In the search bar, search for and open Balance Sheet Comparison.
  3. Select Customize.
  4. Under Rows/Columns, select the Columns drop-down, then change it to the desired comparison period.
  5. Select Memorize
  6. Enter a new name to save if you wish to create a custom version

How do I print the QuickBooks Income Statement?

  • Start QuickBooks
  • From the Reports menu
  • choose Company & Financial
  • then choose Profit & Loss Standard
  • On the Display tab
  • change the date range to 12 months
  • (for example, select Last Fiscal Year in the Dates drop-down).
  • Change the Columns drop-down from ‘Total only’ to ‘Month.’
  • Learn QuickBooks

How do I customize the QuickBooks Income Statement?

You can customize your Income Statement report to show Year-over-Year columns.

Step 1: Run a report

  1. Go to the Reports menu.
  2. Find and open the report you want. …
  3. Use the basic filters at the top of the report to adjust things like the report dates.
  4. Select Customize to open the customization window.
  5. Under Rows/Columns, select the Columns drop-down, then change it to the desired comparison period.
  6. Select Memorize
  7. Enter a new name to save if you wish to create a custom version
QuickBooks Consolidated Financials

QuickBooks Consolidated Financials

Sage Timeslips Support


#nearme, #quickbooksnearme, #quickbooksconsolidatedfinancials, #quickbookconsolidatedincomestatement, #consolidatequickbookscompanies, #quickbooksinventory, #quickbooksBOM, #quickbooksassembly, #tipsforconsolidationofaccounts, #quickbooksapp, #quickbooksenterprisesubsidaries

QuickBooks Advanced Report Bill of Material

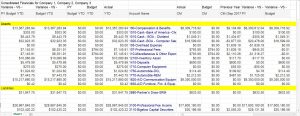
QuickBooks Advanced Report Bill Of Material

QuickBooks Advanced Report – Bill of Material – Do you need a detailed Bill of Material Advanced Report For QuickBooks? We can help you. This report is a sample that shows that you can get what you need for your QuickBooks Inventory Assembly component, bill of material detail or other areas of the system.

Below is a list of Fields that are included on this customized QuickBooks Advanced Bill Of Material Report:

  • Inventory assembly (Bill of material ID)
  • Bill of material description
  • Component ID
  • Component description
  • Quantity required
  • Item Cost
  • Bill of material Total Cost
  • Bill of materials sales price
  • Quantity on hand
  • Total Cost of Quantity on hand

This report is sorted by the inventory assembly item id. The Total Bill of Materials Cost is not directly tied to the cost or avg cost values. The total cost of your bill of materials is the sum of the cost values of the components in the BOM. That means the cost of each component multiplied by the number of units required to be used in the bill of material and then each item cost is added to create the total cost of the inventory assembly. For Advanced Reporting for QuickBooks give us a call.

For QuickBooks Training Class view

What is QuickBooks Bill of Material?

The bill of materials is a list of raw materials, sub-assemblies, sub-components, parts, and quantities of each needed to manufacture an finished or end product.

Before you set up your inventory assemblies first you must make sure each item in your bill of materials exists in your inventory list. The other considerations are what type of items will be included in the Bill of Materials (BOM). The options for components include inventory, non-inventory, or service items and burden. These need to be set up as individual items before you create the final bill of material sometimes referred to as the finished item.

These are the steps to add new items in the items list in QuickBooks.

  1. The first step is to click the Gear icon in the upper-right corner and select Products and Services.
  2. Click the New button and select Inventory, Non-inventory, or Service.
  3. Enter the item details. You can reach out for help if you’re unsure of what Income and Expense accounts to use.
  4. lastly Save and close.

The last step is to add the inventory assembly also known as bill of material ID and to let QuickBooks know it will have a bill of material be sure to select the sub item box. You can then select the individual items, services and other options to define what makes up the bill of materials and the quantity required for each item that will be included in the finished good.

When you build a quantity of the assembly the detailed items (aka the component parts) are removed from the available inventory. The finished item will add to the available quantities the number of items built. The total cost of the items included in the bill are added together and now becomes the total cost of each built item.

What is the difference in a QuickBooks assemblies and QuickBooks bundles?

The term bundle refers to a group of items that you can sell and track in QuickBooks. For example, you can create a bundle called Bird Bath Bundle, which consists of item Bird Bath bottom and Bird Bath Top.

Group items you often sell together into bundles so you can easily add multiple items to transactions.

Bundles can have up to 50 items

There is no additional markup or change in price for bundles. (Bundles aren’t assemblies.) The price of a bundle = The total price of all its items.

You can’t track quantity on hand for bundles so if you want more detail about how many you buy and sell make them stock items

To add a bundle just like any other item. Click Create (+) > Invoice to add the bundle to an invoice.

The form shows whether you choose to show/hide bundle items, either “Your customer won’t see any of the items in this bundle” or “Your customer will see all items in the bundle.”

You can search for bundles by name or SKU like any other item.

Once you add a bundle to a form, you can add, edit, and delete items. You can also discount the bundle.

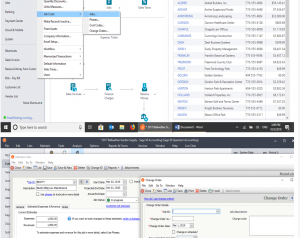
This is the sample view of the

QuickBooks Advanced Report Bill of Material

QuickBooks Advanced Report Inventory Assemblies and Components Detail

QuickBooks Advanced Report Inventory Assemblies and Components Detail

Sage Timeslips Support 

Software Installation

#quickbooksbillofmaterial, #quickbooksadvancedreport, #quickbooksadvancedreports, #quickbooksinventory, #quickbooksBOM
X