Sage 50 2019 – Is it time to make the decision to use the most versatile small business accounting software?
What are the System Requirements for Sage 50 2019
Processor operating frequency:
Pro and Premium Edition: 1.0 GHz or higher (2.0 GHz recommended)
Quantum and Accountant Edition: 2.0 GHz or higher (Multiple-core processor operating at 2.33 GHz recommended)
4 GB RAM. Recommended 6 GB RAM
4 GB hard disk space (additional 1 GB needed for installation)
Latest version of Internet Explorer
Microsoft® supported version of Windows 7, Windows 8.1 or Windows 10 (with the latest updates from Microsoft)
256-colour or higher SVGA monitor, minimum resolution of 1024 x 768
CD-ROM drive
Forms that can be sent via email require MAPI-compliant email client, Internet connection, and email service
Sage 50cloud integration to Microsoft Office 365 requires Microsoft Office 365 Business Premium
Multiuser (Premium and higher) optimized for Windows 7, Windows 8.1 and Windows 10. Dedicated server recommended: Windows Server 2016, Windows Server 2012, Windows Server 2012 R2, Windows Server 2008 R2, Windows Small Business Server 2008 R2
Terminal Services: Windows Server 2016, Windows Server 2012, Windows Server 2012 R2, Windows Server 2008 R
High speed Internet connection (for subscribed Sage online services, for example, Sage Drive)
Integration with other software packages
Word and Excel integration requires 32-bit versions of Microsoft Word and Microsoft Excel 2010, 2013 or 2016
Conversion: Converts all data from previous versions of Sage 50 starting with Sage 50 Accounting Release 2014.0. And yes it is possible to convert to a lower-level version or edition. As a national leading provider of Sage 50 professional services we have performed hundreds of updates to the most recent version.
Sage 50cloud now provides payment options using PayPal or Stripe
So why not get paid faster and improve your business cash flow and leverage this feature if you are using Sage 50cloud. You can sign up now to use PayPal or Stripe for your small business. Payments can be accepted online, on a mobile device, in an app or in person using this feature. Consider this new service because it is used inside Sage 50Cloud. This new integration makes getting money from your customer simpler and adds to the current payment options just making Sage 50Cloud a better small business solution.
Recording payments in Sage 50cloud
Apply a Customer Payment to an Invoice. From the Tasks menu, select Receive Money. Enter a deposit ticket ID that can easily represent the type and source of payment. Lookup, enter or select the customer ID. Enter a check/reference number that will help identify the receipt (for example, the customer’s check number). Or you can now select PayPal.
Manage all your payments in one place and eliminate the hassle of manual data entry. Activate built-in payments and:
Accept credit card payments on invoices directly in software
Automatically post to the General Ledger —no manual entry
Sync online or onsite payments directly to the General Ledger
Feel confident payments are secure
Customers can easily sign–up to start using PayPal or Stripe and accept payments using a business account. This feature makes it one of the most flexible methods of digital payment. Set up your PayPal business account, activate this in Sage 50Cloud and you are ready to go. Sage 50cloud customers can start taking for payments for new or existing invoices right away.
This new integration between PayPal or Stripe and Sage 50cloud giving your businesses more choices for accepting payments from your customers. For businesses like yours this new feature can be setup within minutes, activated and in put into action.
Create Purchase Orders from Work Tickets in Sage 50
How do you autofill or auto create Purchase Orders from work tickets in Sage 50?
Sage 50 allows you to set up Inventory Item Defaults to auto create purchase orders in Sage 50 behind the scenes. The Ordering tab of this window has options that let you enable the auto-creation of POs for:
drop-ship transactions
non-drop-ship transactions
work tickets
Important:For auto-creation of purchase orders to work, your company must be using the real-time posting method.
You can treat each auto-created purchase order just as you would a manually created one. You can edit the purchase order, print it, or e-mail it to a vendor in the Purchase Orders window.
Note: Even if your company is set up for auto-creation of purchase orders, Sage 50 will not automatically create POs for recurring customer invoices. Instead, you will have to manually generate POs for any inventory that you need to reorder as a result of recurring invoices.
To auto create purchase orders from work tickets in Sage 50, the following criteria must be met:
Each item must be set up in Maintain Inventory Items with a preferred vendor.
The user who is entering the transactions listed below must have access rights to add Purchase Orders.
The quantity ordered of one or more of the items must cause the quantity available as of the transaction date to fall below minimum stock levels.
If these conditions are met and your company is set up to auto create purchase orders in Sage 50. Sage 50 will automatically create a purchase order each time a work ticket is saved. In addition, to ensure that auto-creation works most effectively, each item in Maintain Inventory Items should be set up with a minimum stock level and minimum reorder quantity. Sage 50 will auto-create purchase orders from Work Tickets for inventory items that fall into the following item classes only
How do you update work tickets in Sage 50? What are work tickets in Sage 50 used for?
From time to time, you will need to update work tickets with your progress. Follow the steps below to update a work ticket.
From the Tasks menu, select Work Tickets. The Work Tickets window appears.
Click the Open button and select the ticket that you want to update and click OK. The selected work ticket information appears in the Work Ticket window.
Update any of the information that has changed on the work ticket.
If you have finished or received items in the component list, select the corresponding Finishedcheck box and enter the Act Hours, if you are tracking hours.
Then, click Save. After you have marked one item in your component list as finished, your work ticket is given a status of In Progress.
How to print a Crystal Report in Sage 50 – For older versions of Sage 50 to print a Crystal Report in Sage 50, you must preview the report and print using a Crystal Reports license. If you currently have a license for Crystal Reports and Sage 50 then follow these simple steps to print a Crystal Report in Sage 50:
In Sage 50, select Reports, Crystal Reports from the main menu.
Highlight Vendor Detail List and click the Preview button or double-click Vendor Detail List.
Click OK to continue. The report opens in Crystal Reports.
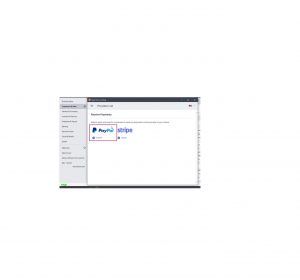
Select Report, Refresh Report Data to ensure that the report is displaying the most recent information.
Ensure that Use current parameter values is selected and click OK. The report refreshes.
Select File, Print, Printer.
A message appears, asking if you would like to use the default printer. Select Yes. Then, click OK to print the report. One page of the report is shown on the next page
Crystal Reports
Yes, Crystal Reports is one way to extract data from Sage 50 and we can train you on the process. You would not need to have the product prior to the training. However, we have found that on-line training without the ability to immediately practice what has been demonstrated has a lower retention rate. You will also need to gain experience by practicing. The final element is to be able to find the appropriate data tables and fields to retrieve the data for use within those reports.
Please note, that although Crystal Reports can still be used with Sage 50, Sage has not included Crystal Reports as part of the Sage 50 product since 2014. A license has to be purchased separately. It is generally not recommended as the external report writer of choice unless reports were created prior it’s being removed from the product. It is most often required when these reports are still needed or new reports are required that cannot be created using the currently support Sage Intelligence external report writer.
Sage 50 Advanced Reports Options
Crystal Reports
Financial Designer
Sage Intelligence
Choose printing preference
The first step is to confirm the types of reports that you are expected to produce. This will confirm that Crystal Reports in the most appropriate choice for those reports. Other reporting options include
The built in report designer
Financial statement designer
Built in forms designer
Sage Intelligence
Print a Crystal Report in Sage 50
If Crystal is the most appropriate choice for an external report writer, I would be glad to set up an online training session for you. It is always helpful to know the reports you wish to produce, so I can choose one as example during training to give you experience in determining the tables and fields to create a specific report.
Learn More
Give us a call 800.475.1047
Sage 50 data tables for use with Crystal Reports
Journal Header Fields
The following field information is intended to assist those who design reports for Sage 50 using Crystal Reports.
Filename: JRNLHDR.DAT
JRNLHDR.DAT has one record for each transaction entered in Sage 50. There is a one-to-many relationship between header records and row records. Each header record can have any number of related rows.
Note: Memorized Transactions are stored in StoredTransHeaders.DAT. All the field names are the same as in JrnlHdr.DAT.
Indexes and Their Uses
JRNLHDR.DAT has 22 keys, as follows:
0 = By JournalKey (Shadow, Journal, Period, TrxNumber, Partner.
1 = By PostOrder
2 = By Posted and then by PostOrder
3 = By LedgerKey (Module, CustVendEmpID, Date, and then by PostOrder
4 = By Reference
5 = By Date
6 = By Journal, then by Date, then by Reference, then by LedgerKey.RecordNumber, and then by PostOrder..
7 = By JournalKey_Journal, then by JrnlKey_Per, and then by Reference.
8 = ByGUID
9 = By Journal, then by Reference.
10 = By Journal, then by Completed Date
11 = By ReceiptNumber
12 = By Journal, then by MainAccount, then by Deposit Ticket, and then by Date
13 = By Journal, then by Extended JournalType, then by Date, then by Reference, then by CustVendEmpID, and then by PostOrder
14 = By Journal, then by Date, and then by PostOrder
15 = JrnlHdrByJrnlCVEReference
16 = JrnlHdrByElectronicDateSent
17 = By Recur Number, By Date
18 = By JournalEx, then by Date, then by Reference, then by LedgerKey.RecordNumber, and then by PostOrder
19 = RecurNumber
20 = JrnlHdrByElectronicDateSent
21 = By JournalKey_Journal, then by CustVendId, and finally by Date
22 = ByLedgertKeyModule, then by CustVendEmpID and then by Date
Crystal Reports can be previewed from Sage 50 when the report is displayed in the Crystal Reports Viewer. The viewer automatically refreshes a report when opened, but refreshing the report ensures that the most recent data appears on the report preview. Follow these steps to see how easy previewing a Crystal Report in Sage 50 using the Crystal Reports Viewer is!
In Sage 50, select Reports, Crystal Reports from the main menu. The Select a Report window opens.
In the Report List, highlight Vendor Balance Graph v9and click the Preview button or double-click Vendor Balance Graph v9. Crystal Reports for Sage 50 starts.
Refresh Report Data to ensure that the report is displaying the most recent information by selecting the Refresh Icon (lightning bolt).
Once you have finished previewing the report, select Close to close the Crystal Reports Viewer window and return to Sage 50.
Click Close to return to the Sage 50 desktop.
Learn More about Crystal Reports and Sage 50.
Beginning with Release 2015, Crystal Reports is no longer accessible from within Sage 50—U.S. Edition
Custom Crystal Reports reports can still be used with Sage 50, but must be opened from the Crystal Reports application
Upgrading to Release 2015 does not remove the Crystal Reports files (.RPT files) from your company directory
To use customizable reports from within Sage 50, it is recommended to utilize Sage 50 Intelligence Reporting
Which premium Crystal Reports are included in in Sage 50?
Premium Crystal Reports included in Sage 50 include:
Assembly Item UPC_SKU Label
Using UPC/SKU (Universal Price Code/Stock Keeping Unit) labels can help you keep track of your inventory more accurately. The individual components you purchase from vendors may already contain their own UPC/SKU labels. However, you can use the Assembly Item UPC_SKU Label report to create labels for the finished products once the items are fully assembled. The labels include the following information:
Item ID
Item Description
UPC/SKU Number
Location
Assembly Planning
This report displays details for a specified assembly, including the number of components needed, available, and on hand for the assembly. This report is helpful if printed before beginning the production of an assembly because it provides the status of the necessary components. The report includes the following fields:
Item ID
Description
Quantity Needed
Quantity on Hand
Quantity Available
Component Pick List
This report displays an itemized list of the locations and quantities of all components required for the specified assembly item. It is helpful to run this report right before you are about to assemble an item. The report includes the following fields:
Component ID
Description
Quantity Needed
Location
Initials
Deficient Components List
This report is useful for viewing which bill of material components of an assembly are in shortage. By seeing which components you’re missing, you’ll know which components you need to order before you can create the assembly. The report shows the following fields:
Component ID
Description
Quantity Needed
Quantity on Hand
Quantity Available
Item Sales by Customer and Purchase Order Number
This report displays item sales, sorted by customer purchase order number. This report was designed to provide an alternate method for looking up sales orders and invoices— sorted by the customer, then the customer purchase order number, and then by the sales order or invoice number. The report displays the following fields:
Customer ID
O. Number
Reference
Date
Description
Item Quantity
Item Subtotals
On Hand Detail Report
This report displays detailed purchase information for inventory items that have a LIFO or FIFO costing method. The information in this report can be used to show how inventory has been valued. The On Hand Detail report displays the following fields:
Item ID
Item Description
Receipt Description
Reference
Receipt Date
Quantity
Unit Cost
Amount
Production Schedule
This report displays the assembly items on open sales orders, and is sorted by the Ship By Date. This report is designed to help you meet shipping deadlines by showing which assembly items need to be manufactured, and the order in which they need to be shipped. The report displays the following fields:
Ship By Date
Sales Order No
Customer ID
Customer Name
Item ID
Description
Stock Status by Location
Stock Status report, but includes the current quantities on sales orders and purchase orders in addition to the current quantity on hand. It also shows the history of the item (the quantity sold, received, and adjusted in the specified date range). The report displays the following fields:
How do you use units of measure in Sage 50? What are units of measure in Sage 50 used for?
The Maintain Units/Measures window allows you to set up new units/measures (U/M), other than the Stocking U/M, for purchasing or selling inventory items. In this window, you can set up new units/measures, change the ID for, and delete existing units/measures.
Note: You can access this window only if you have selected the option to Enable Multi-Packs and buying and selling items in different units/measures in the Inventory Item Defaults window.
If you purchase or sell items in bulk or in multi-pack units, create new units/measures to accommodate bulk sales or purchases. This saves you time because you won’t have to enter a new item for each unit/measure of an item that you buy or sell. By creating a new unit/measure based on the stocking unit, you can purchase and sell the multi-pack unit and the single units contained in the multi-pack.
You can set up as many units/measures as you need, but you can only assign two U/Ms to an inventory item: one for sales and one for purchases.
How do you use item multi-packs in Sage 50? What are item multi-packs in Sage 50 used for?
The Item Multi-Packs window allows you to assign additional units/measures to an inventory item, thereby creating a multi-pack. You can access this window by selecting the U/M button, which is located next to the Stocking U/M field in the Maintain Inventory Items window. In the Item Multi-Packs window, you can do the following:
change the Stocking U/M
allow items to be purchased or sold in a unit/measure other than the Stocking U/M, or multi-pack
assign a U/M, weight, and UPC/SCC code for multi-packs that you purchase
assign a U/M, weight, and UPC/SCC code for multi-packs that you sell
You can assign two units/measures in addition to the Stocking U/M to an inventory item: one for purchases and one for sales. When you purchase or sell items in units/measures that you have set up in Maintain Units/Measures, the subsequent item, when purchased or sold, is referred to as a multi-pack. Multi-Packs in Sage 50 are simply any inventory item that has been assigned a unit/measure other than the Stocking U/M. The resulting item, usually a box or a pack, contains more than one stocking unit of the inventory item.
Because you can only assign two units/measures to an inventory item, you should select the unit/measure in which you usually purchase or sell the item. For example if you buy in bulk but sell in single units, select the bulk unit in this window. After you have assigned purchasing and sales units/measures to an inventory item, you will be able to select the U/M for line items on the following windows: Quotes, Sales Orders, Sales/Invoicing, Receipts, Credit Memos, Select For Purchase Orders, Purchase Orders, Purchase/Receive Inventory, and Payments.